SMART Editor Basics
Overview
The SMART Editor is similar to a simple word processor. It is used to enter study data and build the specification. The SMART Editor accepts data input in sentences and tables and uses Natural Language Processing (NLP) to 'read' the data entered and build a model of the scenario. The order of input is unrestricted.
The SMART Editor is accessible via the navigation bar to the left of the screen. New studies and scenarios can be set up and saved scenarios can be loaded directly from this screen, see Study and Scenario Management for more detail.
Toolbar
The SMART Editor Toolbar is split between two rows. The top row contains specific 4C Supply tools, while the bottom row features standard formatting and text editing tools. Hovering over an icon in the toolbar will display a label identifying that tool.

Create new Specification

To create a new scenario for an existing study, click the black folder with the + icon in the Smart Editor menu bar. A dialogue opens in which the user can create a new scenario.
Screen Recording 2025-01-07 at 9.16.10 AM.movCreate a scenario for an existing study
To create a scenario for a new study, simply select Create New Study in the pop up box and enter the study and scenario details.
Screen Recording 2025-01-07 at 9.20.07 AM.movOpen Specification
To open a specification from an existing study or a different study, select the Open Specification icon in the toolbar.
 Screen Recording 2025-01-07 at 9.29.53 AM.mov
Save As
The Save As icon on the top SMART Editor toolbar allows users to copy and save the current scenario as a new scenario either within the same study or to a new study. This is a common practice if a user wants to change a few parameters of the scenario, but still wants the current scenario to remain available.

Similar to the Create New Scenario feature, the scenario can be saved to an existing study or can be saved to a newly created study.
Save Specification
Users should save their work regularly to avoid loss of data. Scenarios are saved using the floppy disk icon in the Smart Editor menu bar. Scenarios are also saved automatically before Master Data is loaded and before an interpretation is run.

Make Scenario Read-Only
The read-only/editable status of a scenario can be set directly from the SMART Editor, or from the Select Study/Scenario menu.

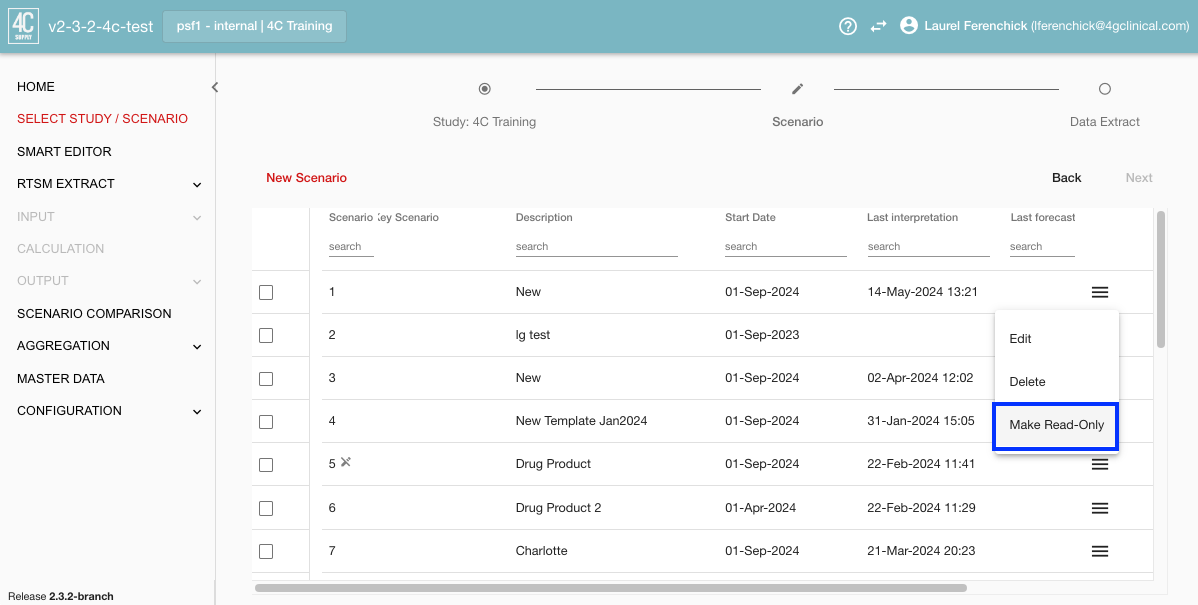
Making a scenario read-only prevents users from modifying the contents of a scenario. Only the user who made the scenario read-only (or an Admin) can remove the read-only status from a scenario. If a scenario is intended for scheduled forecasting, it must be set as read-only before a schedule can be set up. This prevents users from modifying the contents of a scenario so that the schedule will not be interrupted by an interpreter error.
Note: If scenario has been marked as read-only and has scheduled forecasts associated with it, then making it editable again will delete the associated schedules.
Build Study
Selecting this button will begin the interpretation of your specification, the results can be viewed in the Input page (accessible via the Navigation menu). As the interpretation runs, a log will generate on the bottom of the SMART Editor page displaying processing information.
Screen Recording 2025-01-07 at 11.57.29 AM.movAbort Build
Users can actively abort an interpreter run (also known as a build). If, for example, a user forgot to add a region, they can abort the build and make the necessary changes instead of waiting until it finishes. When the build is aborted, the last log line will read 'Interpreter run canceled by user'.
Note, the Abort Build button will be inactive (greyed out) until a build has been initiated.
Screen Recording 2025-01-07 at 12.37.21 PM.movTable Management
Template Table Insert
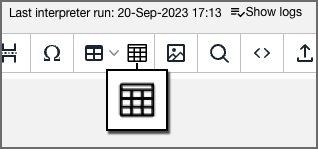
Directly to the right of the table icon, there is a similar, larger table icon that allows users to automatically insert a table template.
By selecting the position in the specification to insert the table and then selecting this icon, a dialogue is launched. The table required can be selected from this dialogue, along with the relevant columns. Mandatory columns appear in grey text and cannot be excluded from the table. The menu includes all valid tables excluding the Site Activation and Enrollment tables. A preview of the table is displayed beneath the open selection.
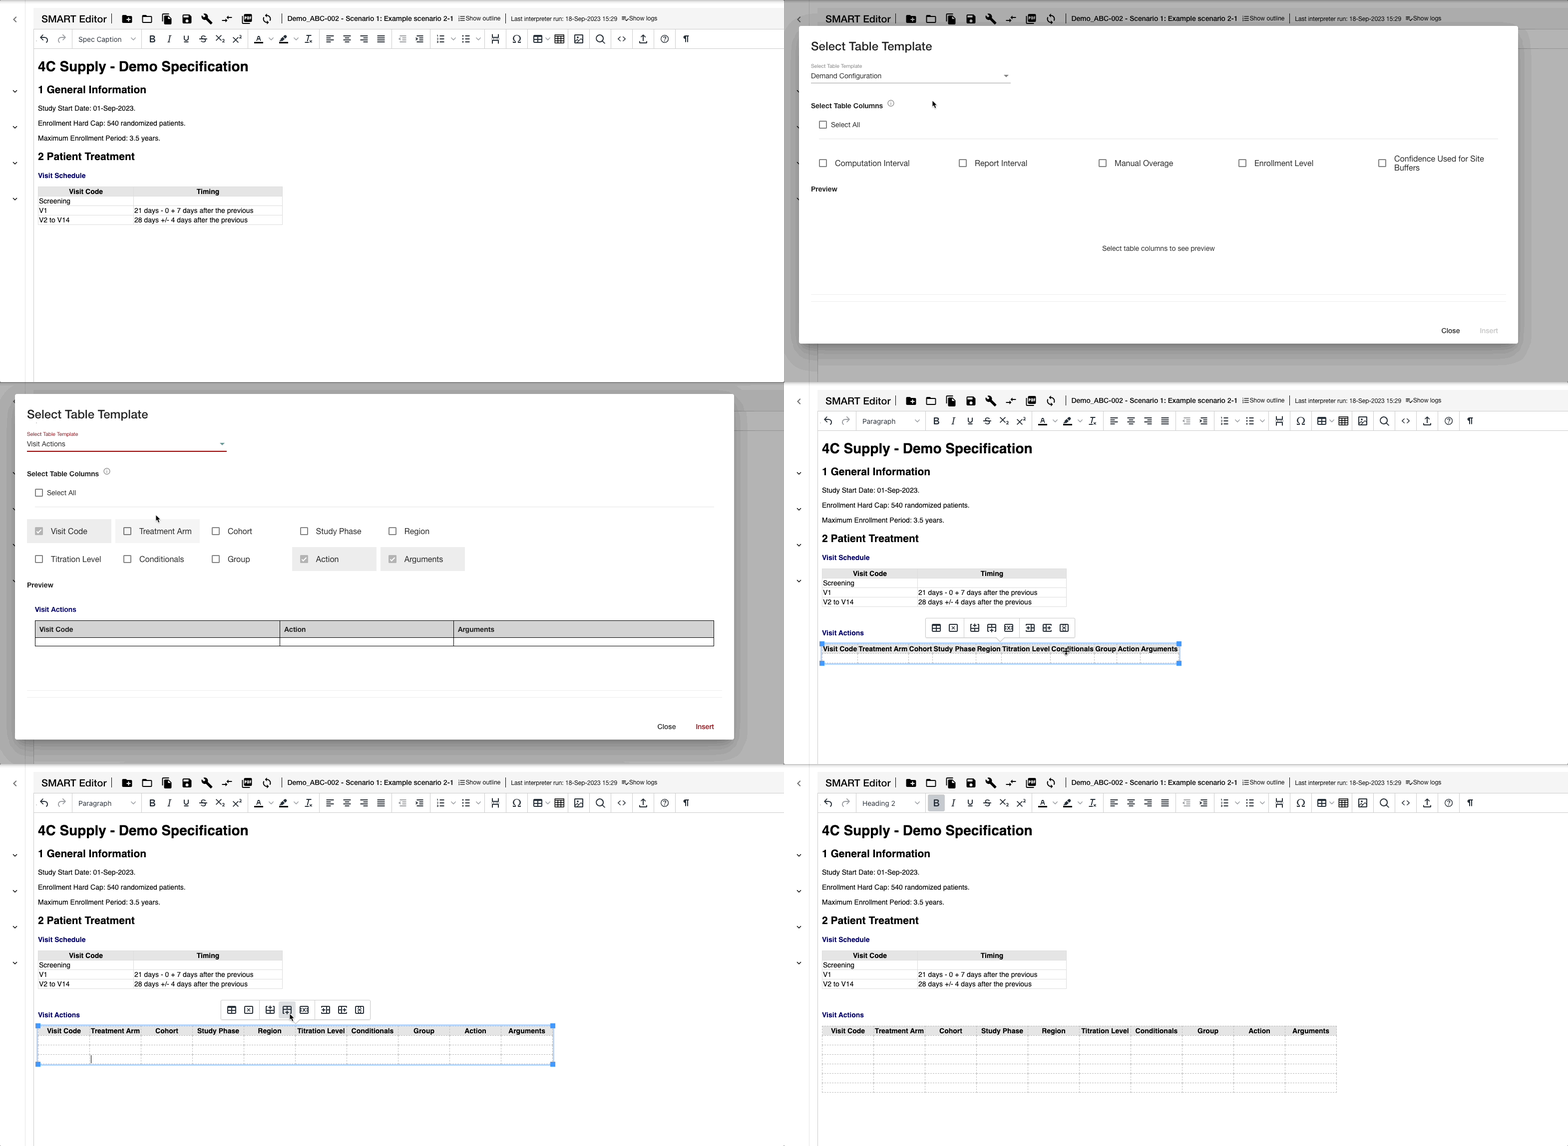
Example of how to use the template table insert feature
When the columns required have been selected, pressing insert will add the table to the open specification. The user can then add and delete additional columns and rows as with any other table.
Copy/Paste a Table from Excel
Tables can be copied in Excel and pasted to 4C Supply® scenario specifications using standard copy/paste commands. Follow the steps below to copy and paste a table from Excel:
Design the table designated for transfer in Excel.
Copy (Ctrl+C/Cmd+C) the table in Excel.
In the 4C Supply® scenario specification, place the cursor in the position where the table should be inserted.
Paste (Ctrl+V/Cmd+V) the copied table.
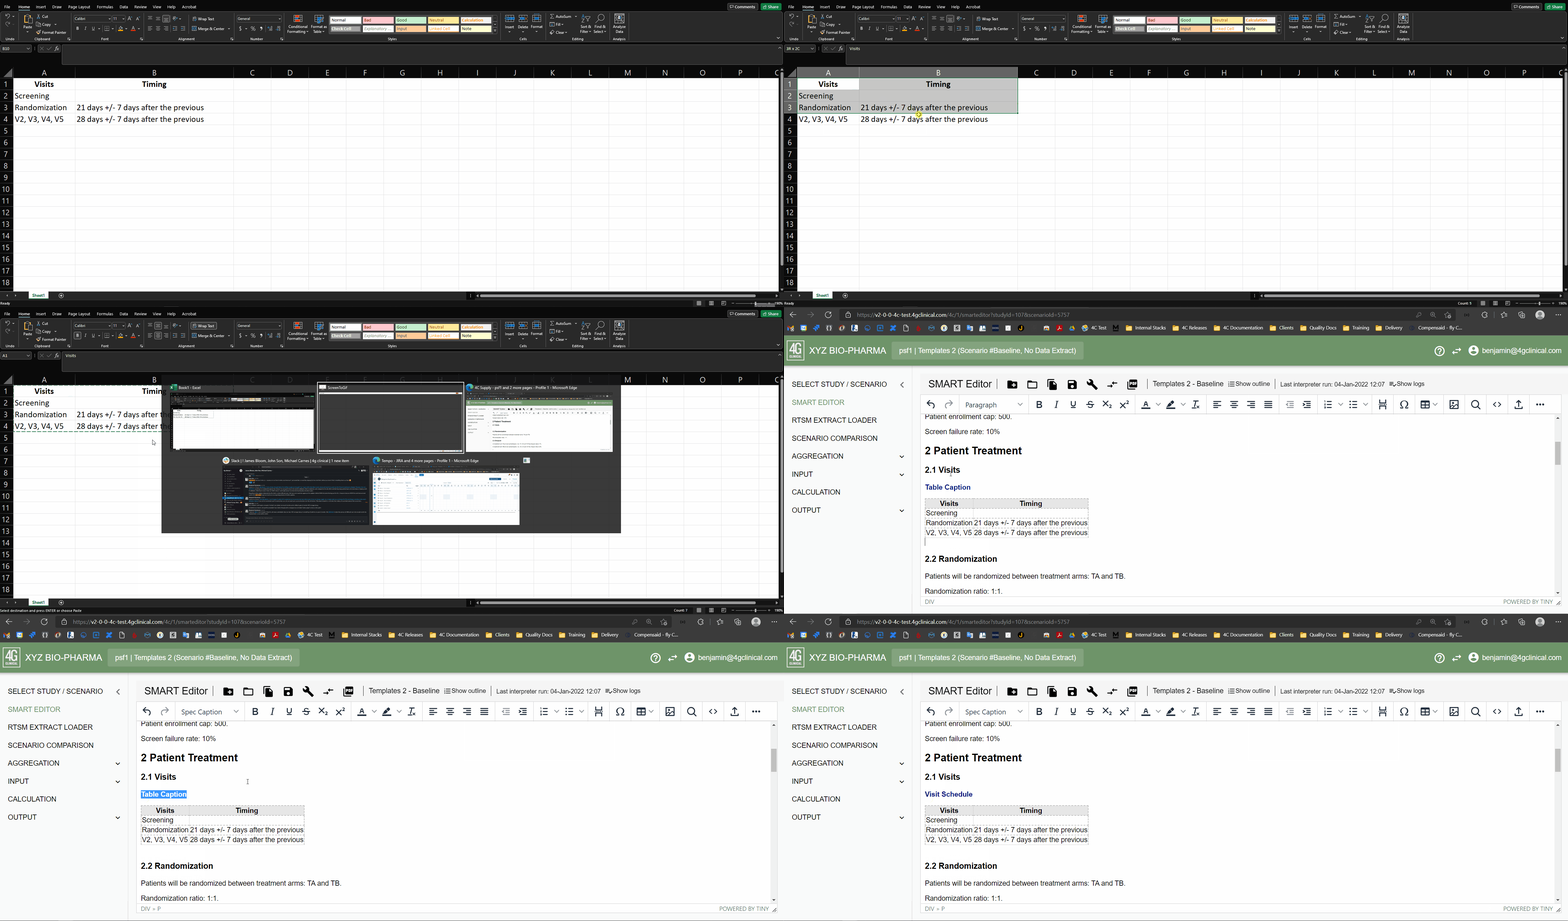
Note: When a table is copied in the 4C Supply® Smart Editor, a paragraph with format spec caption is created automatically above the table. Update this to the correct table title.
Upload a table from a file
Tables can be uploaded to 4C Supply® scenario specification from Excel files using the table upload function. Design the table designated for upload in Excel using the following rules:
Write the table header in cell A1.
Write the column headers in cells A, B, C… of row 2.
Write the contents in rows 3, 4, 5… of the respective columns.
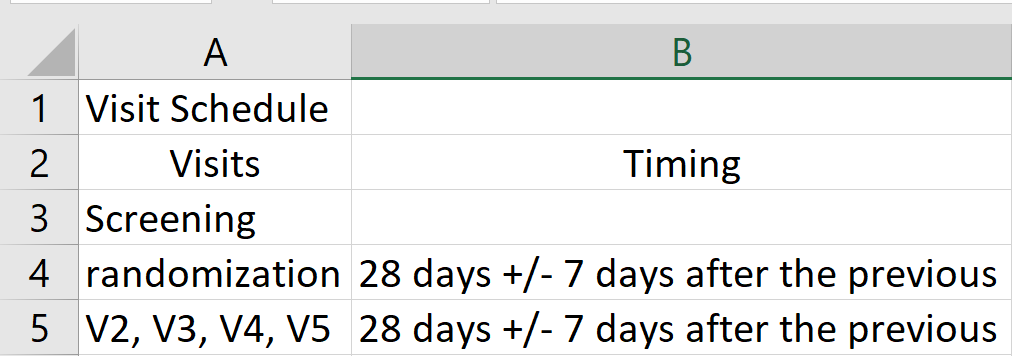
A correctly formatted table in Excel
To upload this file to 4C Supply follow these steps:
Save the table to the local file repository.
Open the 4C Supply® scenario specification.
In the 4C Supply® scenario specification, place the cursor in the position where the table should be inserted.
Click the Upload Table icon and select the Excel file with the table designated for upload.
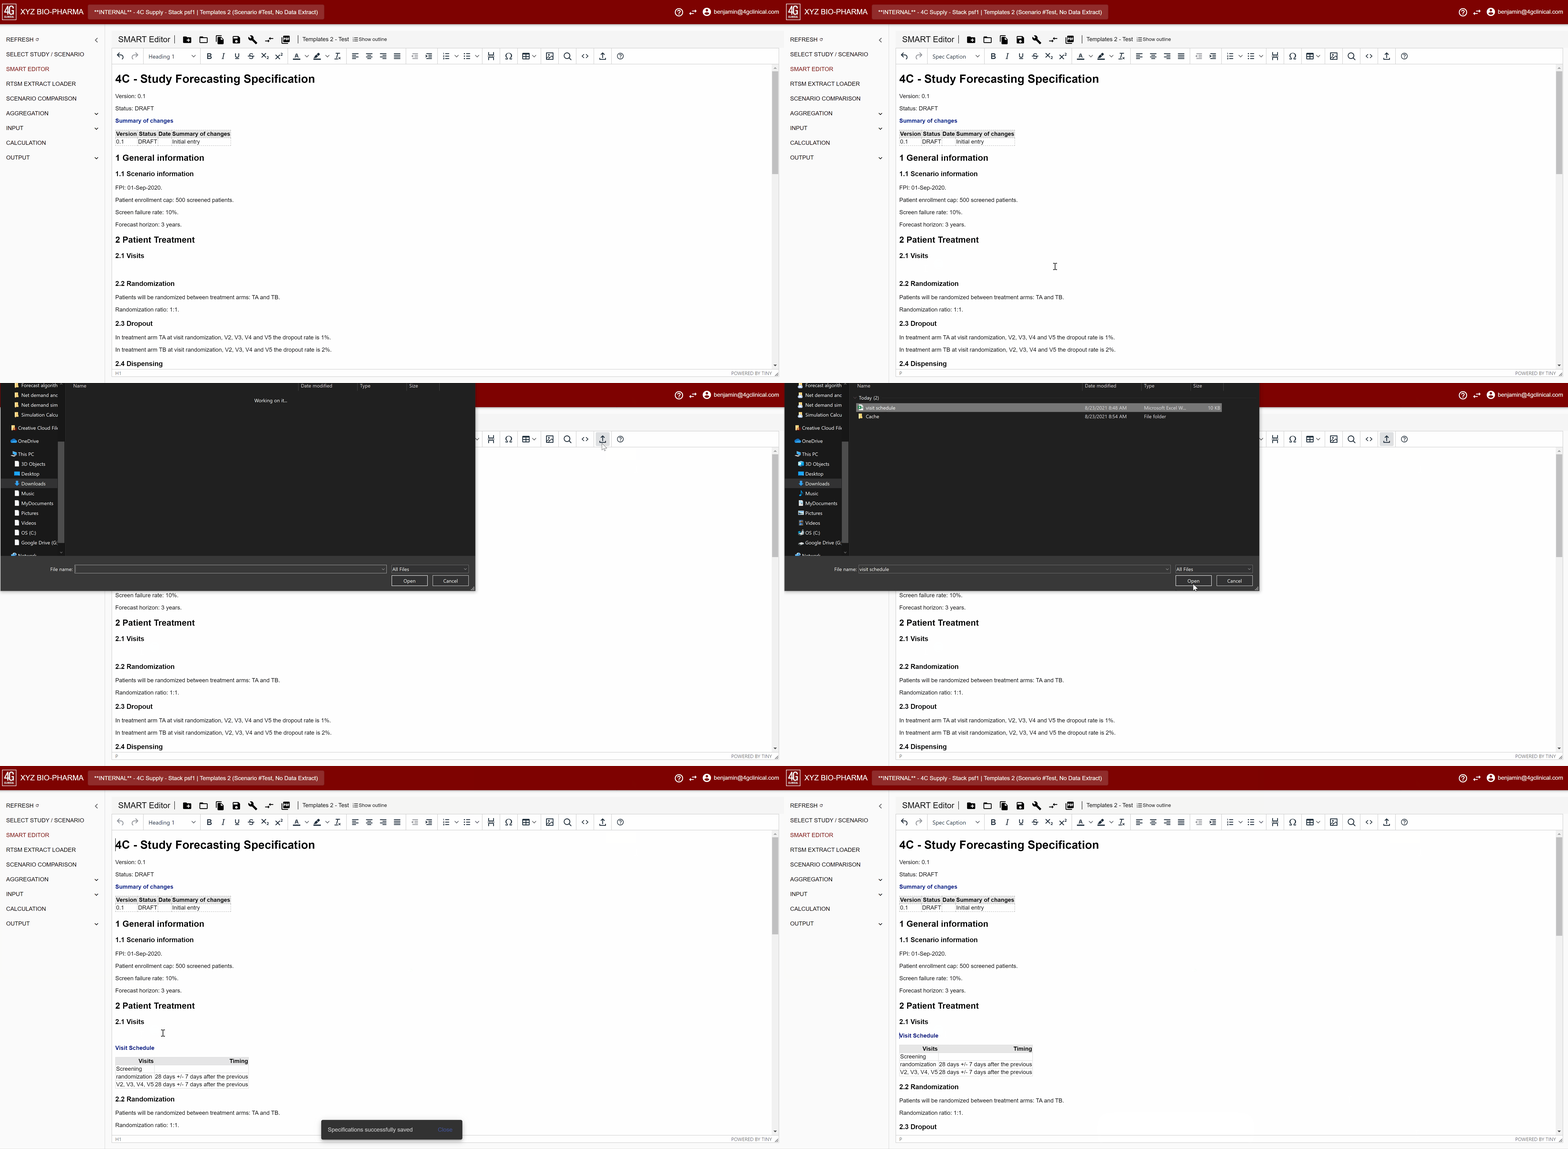
Uploading an Excel file to 4C Supply® Smart Editor
Note: When a table is uploaded in the 4C Supply® Smart Editor, a paragraph with format spec caption is created automatically above the table and populated with the contents of row 1 in the uploaded file.
Create table
Tables can be created directly in the 4C Supply® Smart Editor using the create table function. To create a table follow these steps:
Click on the table icon in the menu bar and select the table layout (number of columns and rows).
Update the table caption to the correct table header.
Populate the column headers.
Populate the table rows.
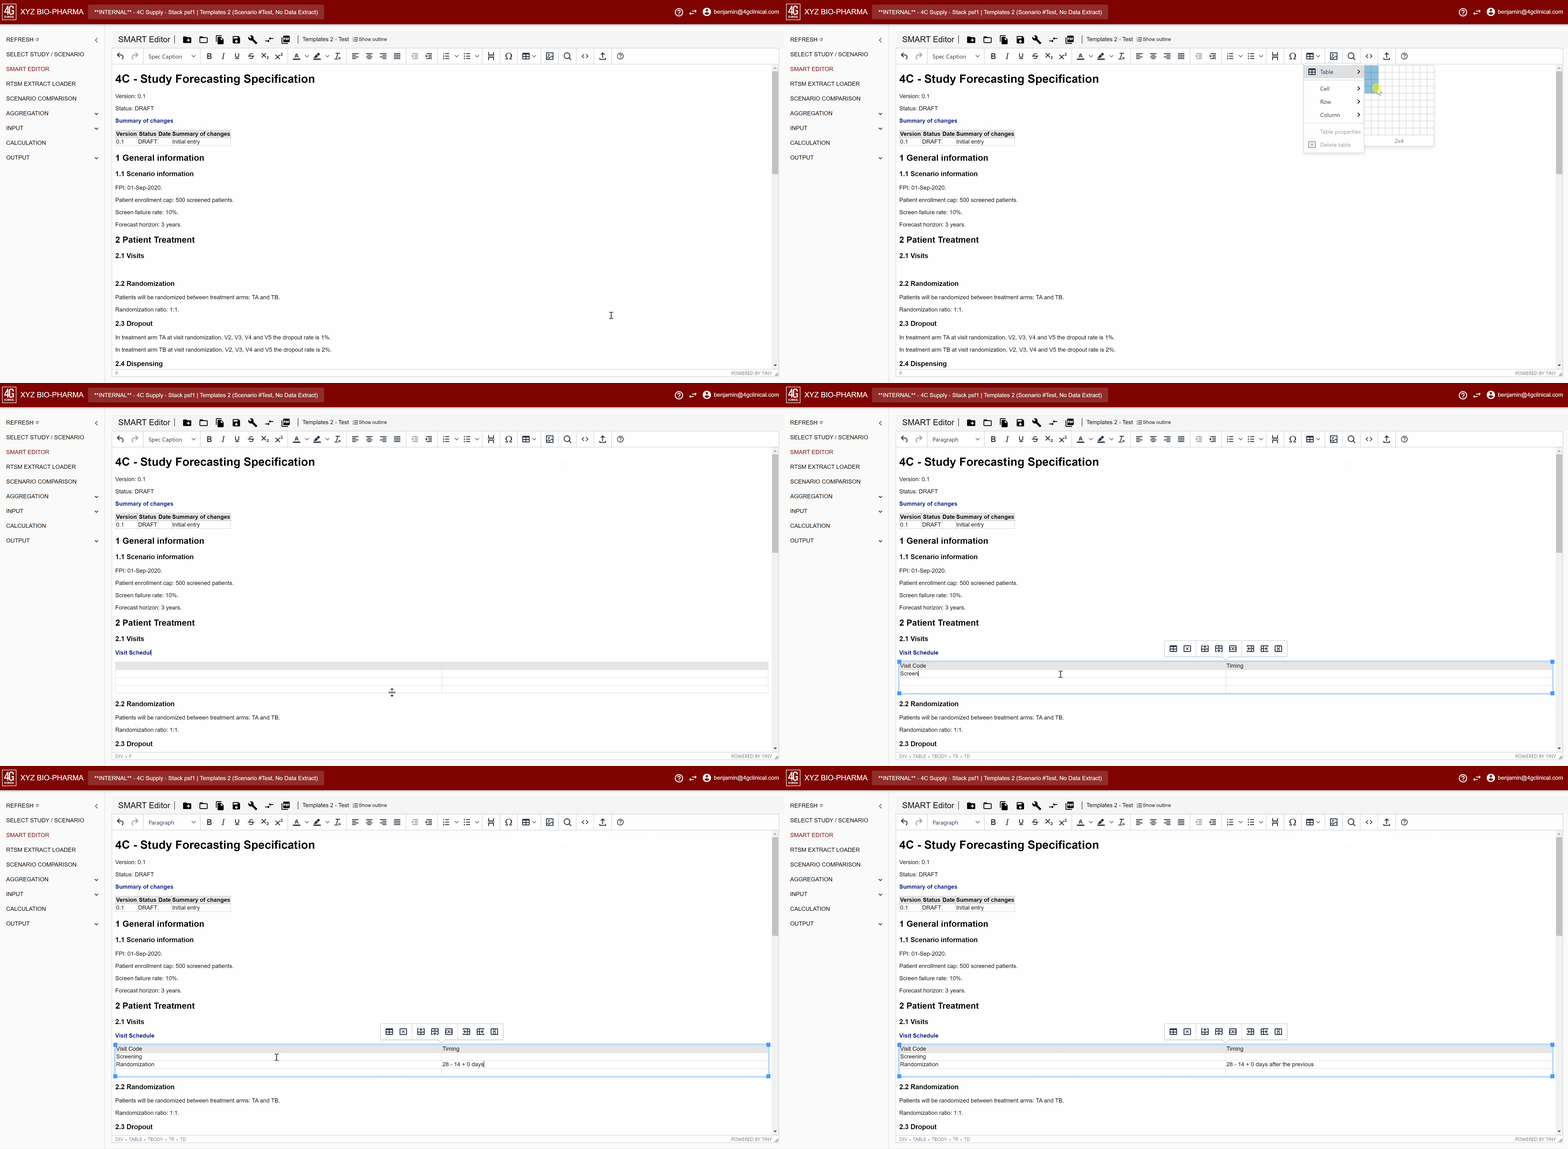
Delete table
Tables can be deleted in the 4C Supply® Smart Editor using different edit table functions.Tables can be deleted using the table popup menu, the table context menu, and the table menu in the menu bar:
Click the ‘delete table’ icon in the table popup menu.
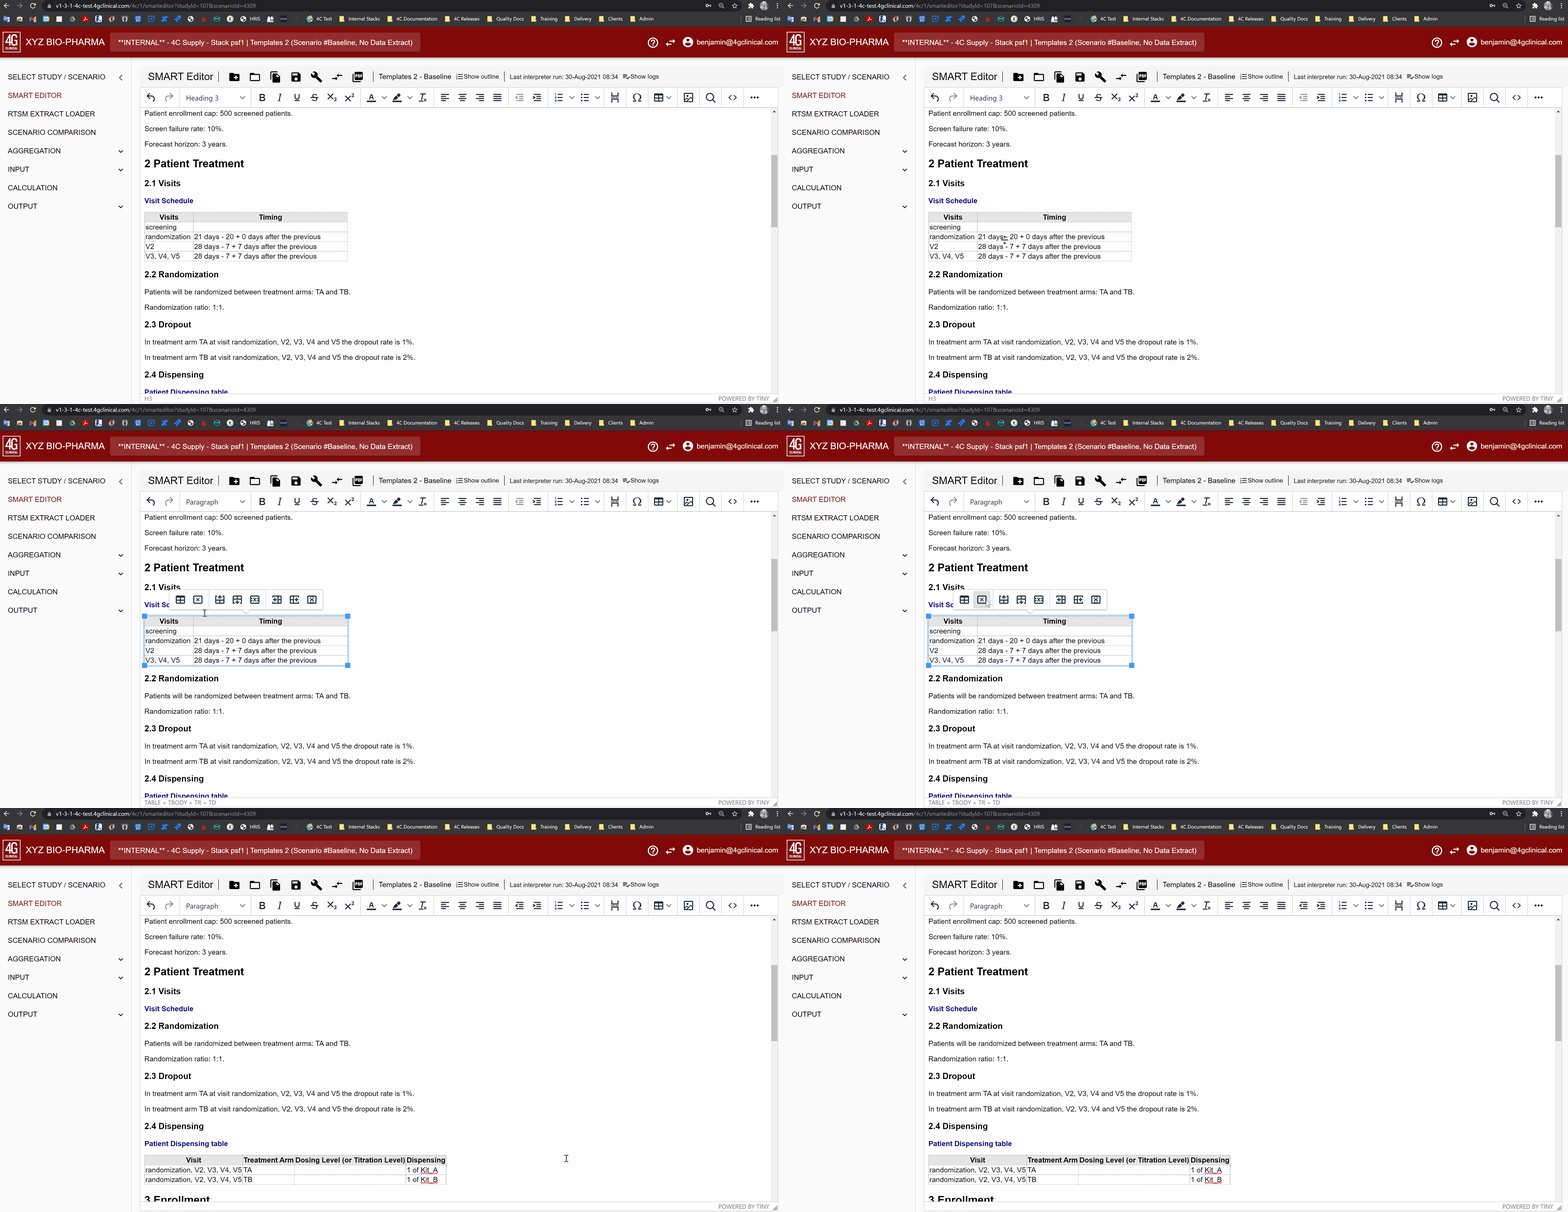
Click the ‘delete table’ icon in the table context menu.
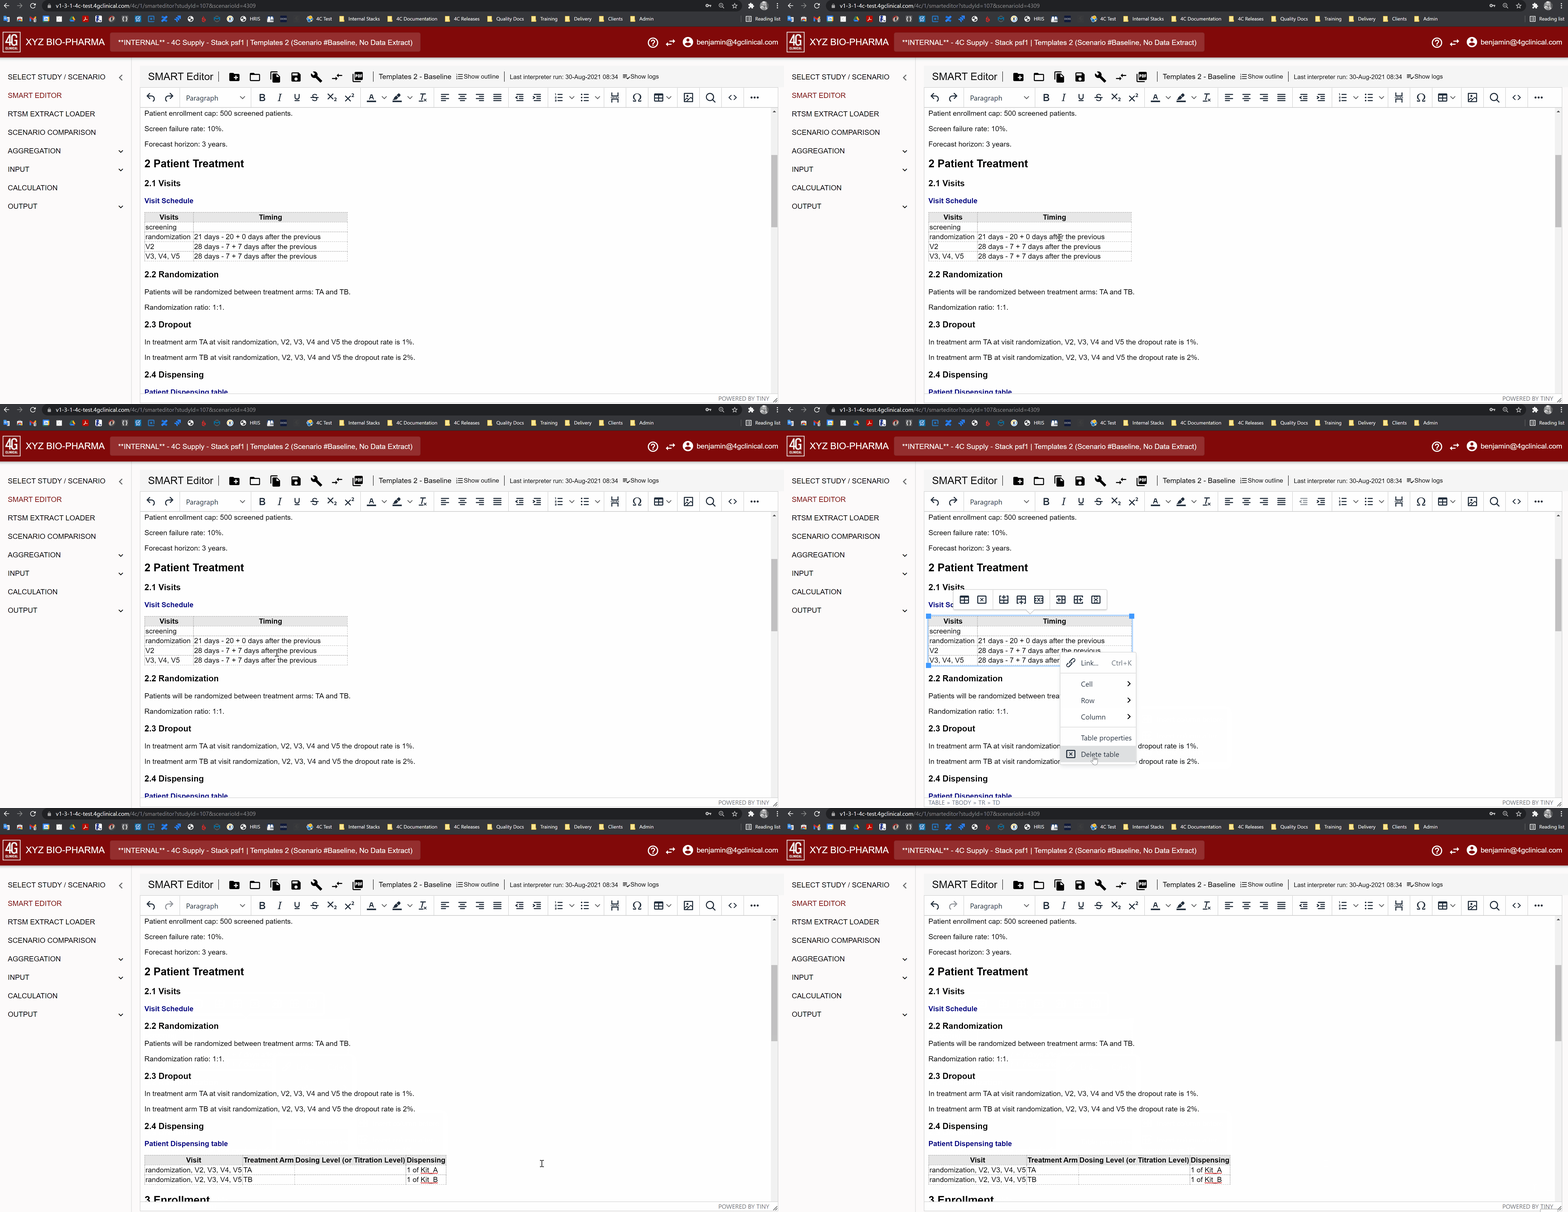
Click the ‘delete table’ icon in the table menu:
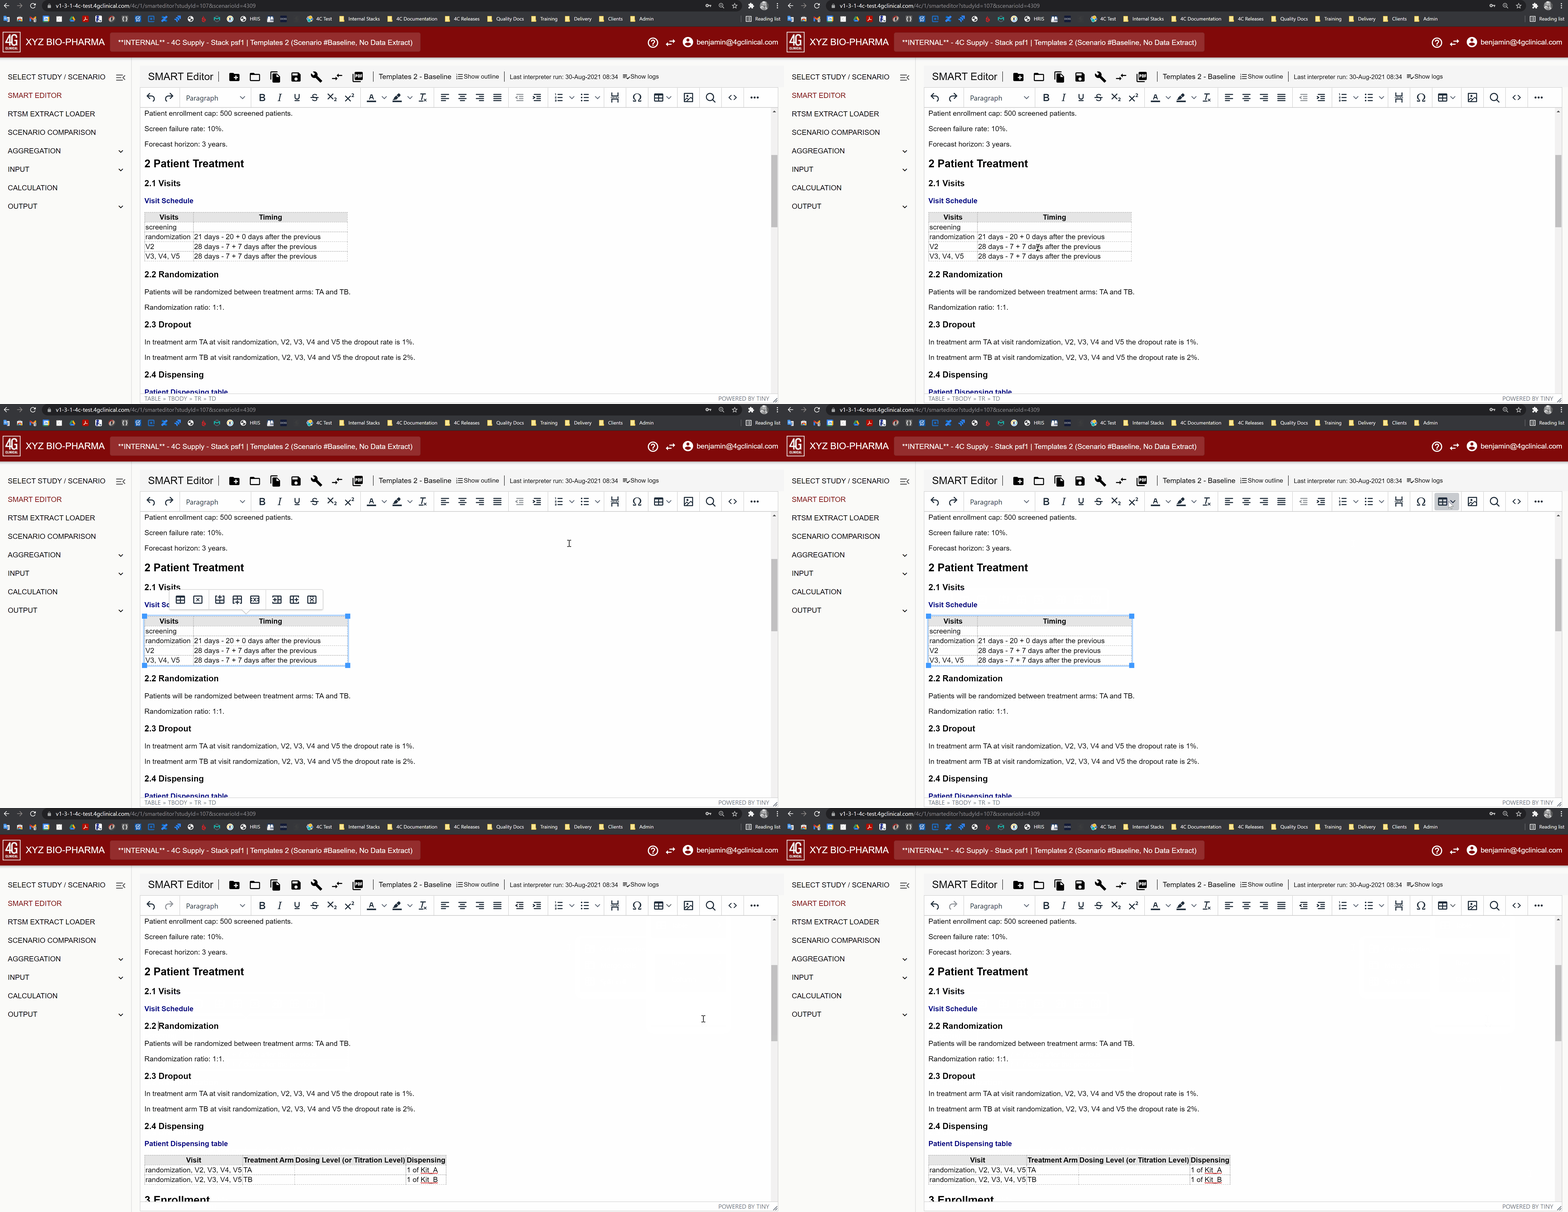
Select table cells
Single or multiple table cells can be selected (highlighted) in the 4C Supply® Smart Editor to carry out actions (e.g. delete, copy). To select single or multiple cells:
Click on the first cell to be selected (inside the cell, before the first text character) and hold mouse button.
Move to the last cell to be selected (inside the cell, ensuring that all cells to be selected have a colored background) and release the mouse button.
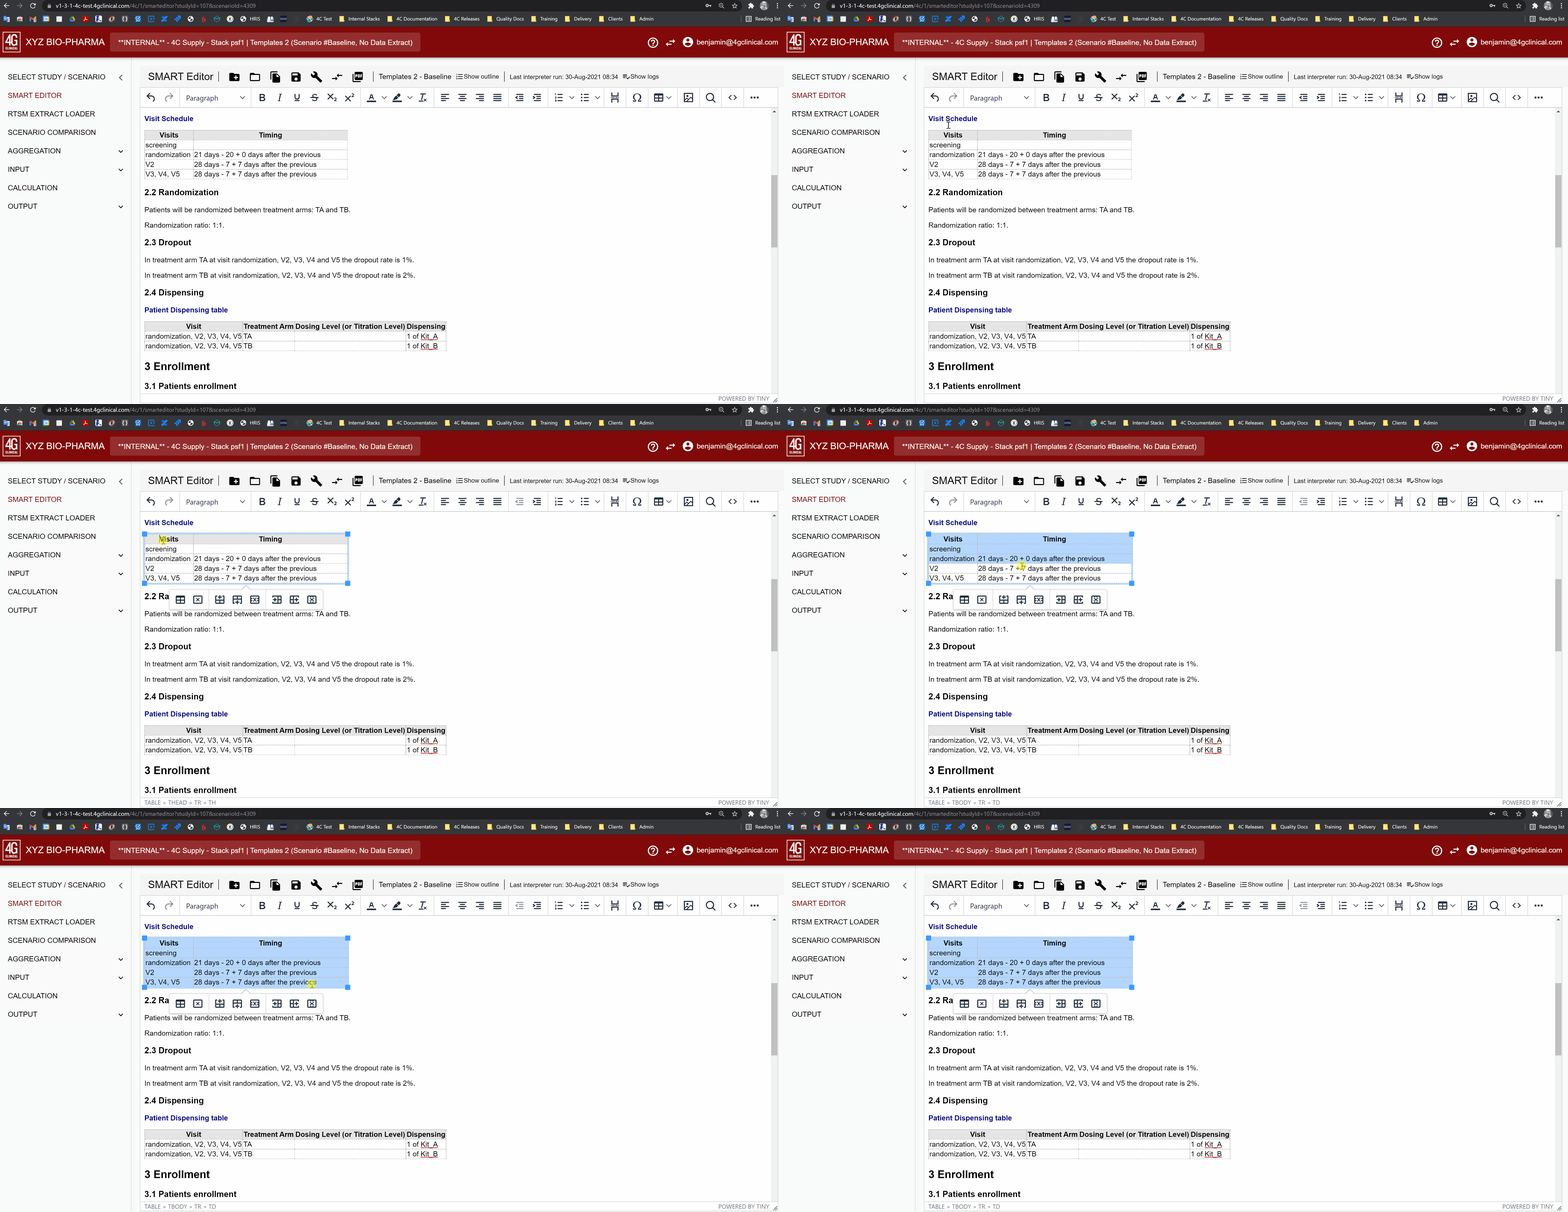
Insert table rows
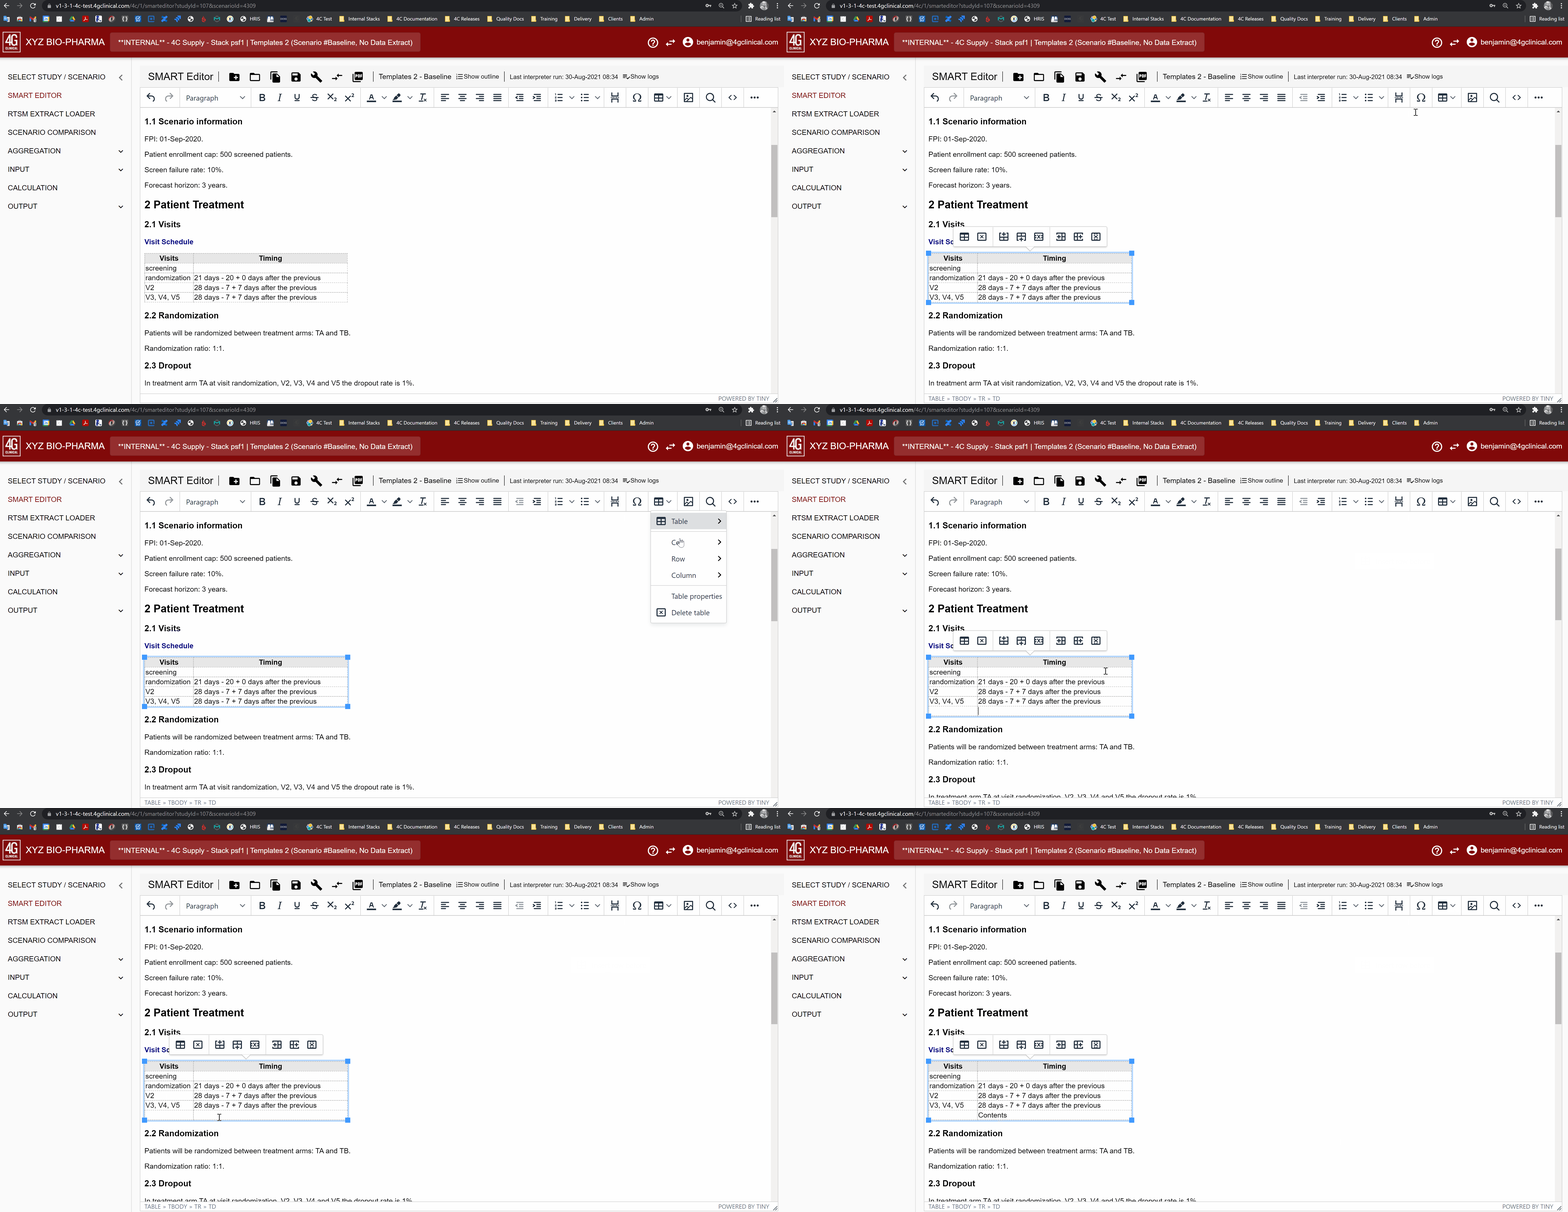
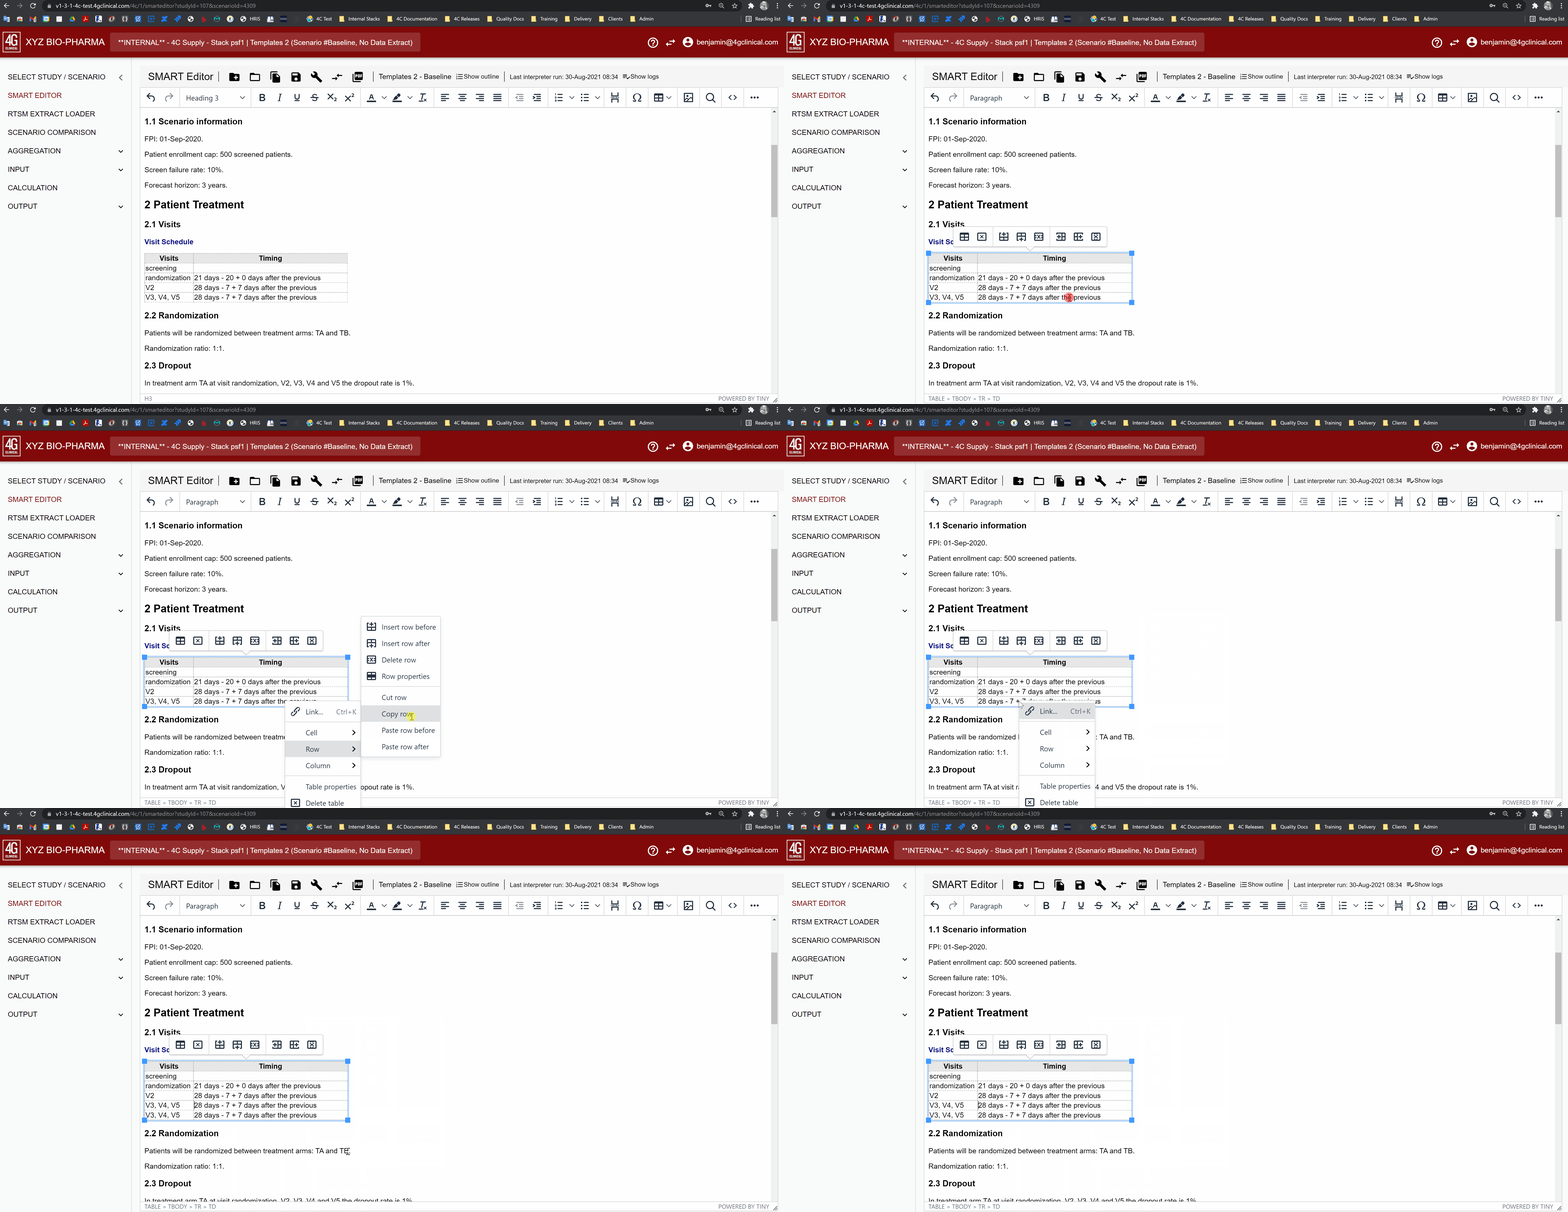
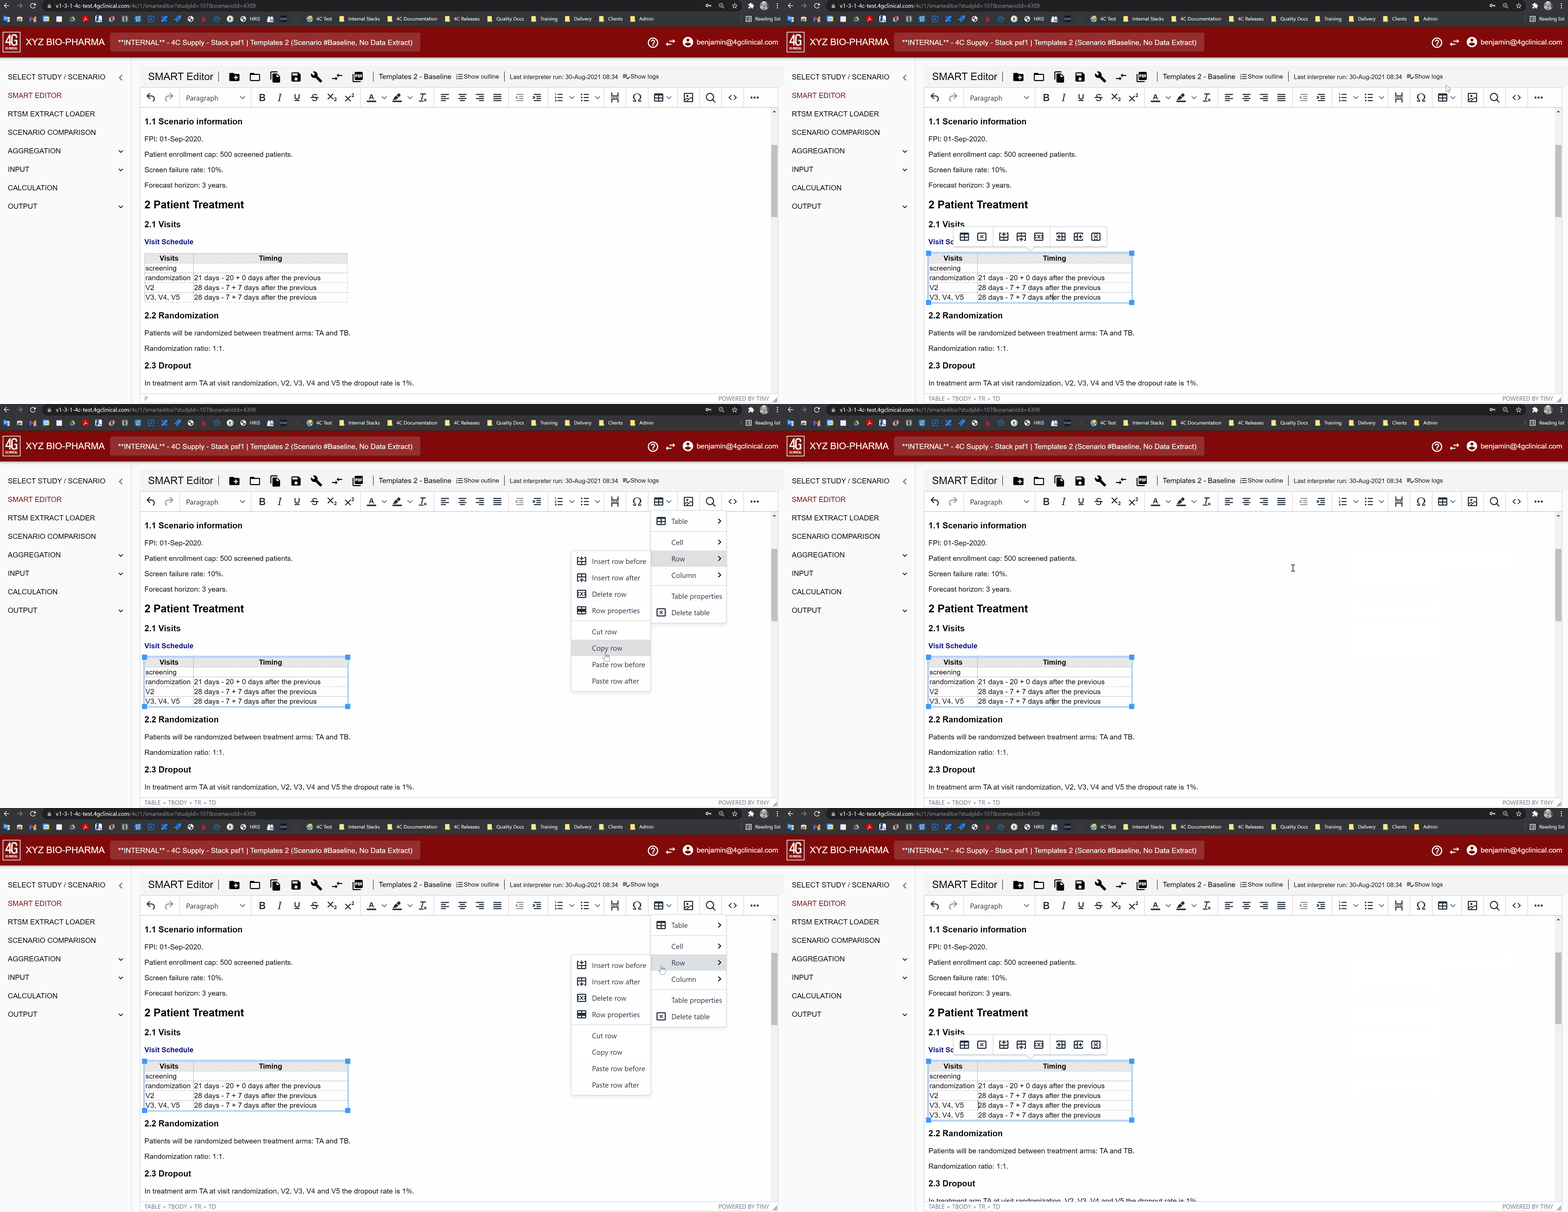
Table rows can be inserted in 4C Supply® Smart Editor using different table edit functions. Table rows can be inserted using the table popup menu, the table context menu, and the table menu in the menu bar:
Click one of the ‘insert table row’ icons in the table popup menu
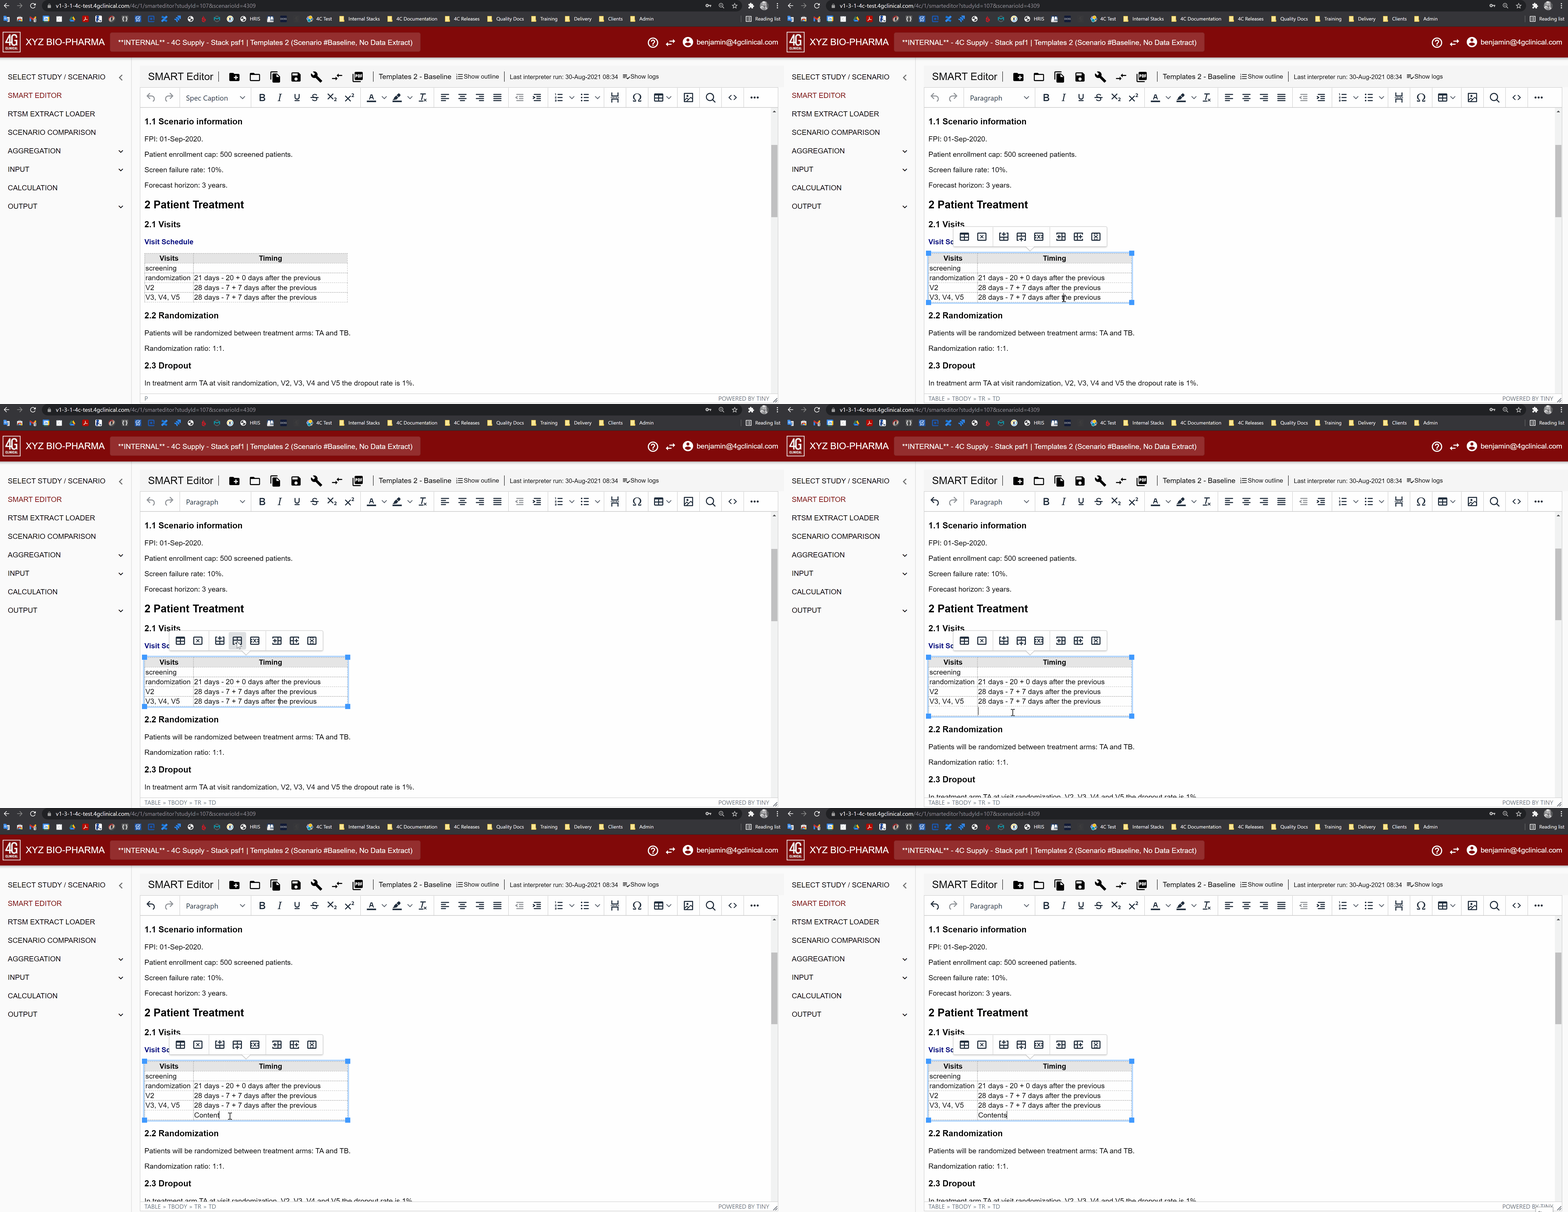
Click ‘insert row before’ or ‘insert row after’ in the table context menu, section ‘row’
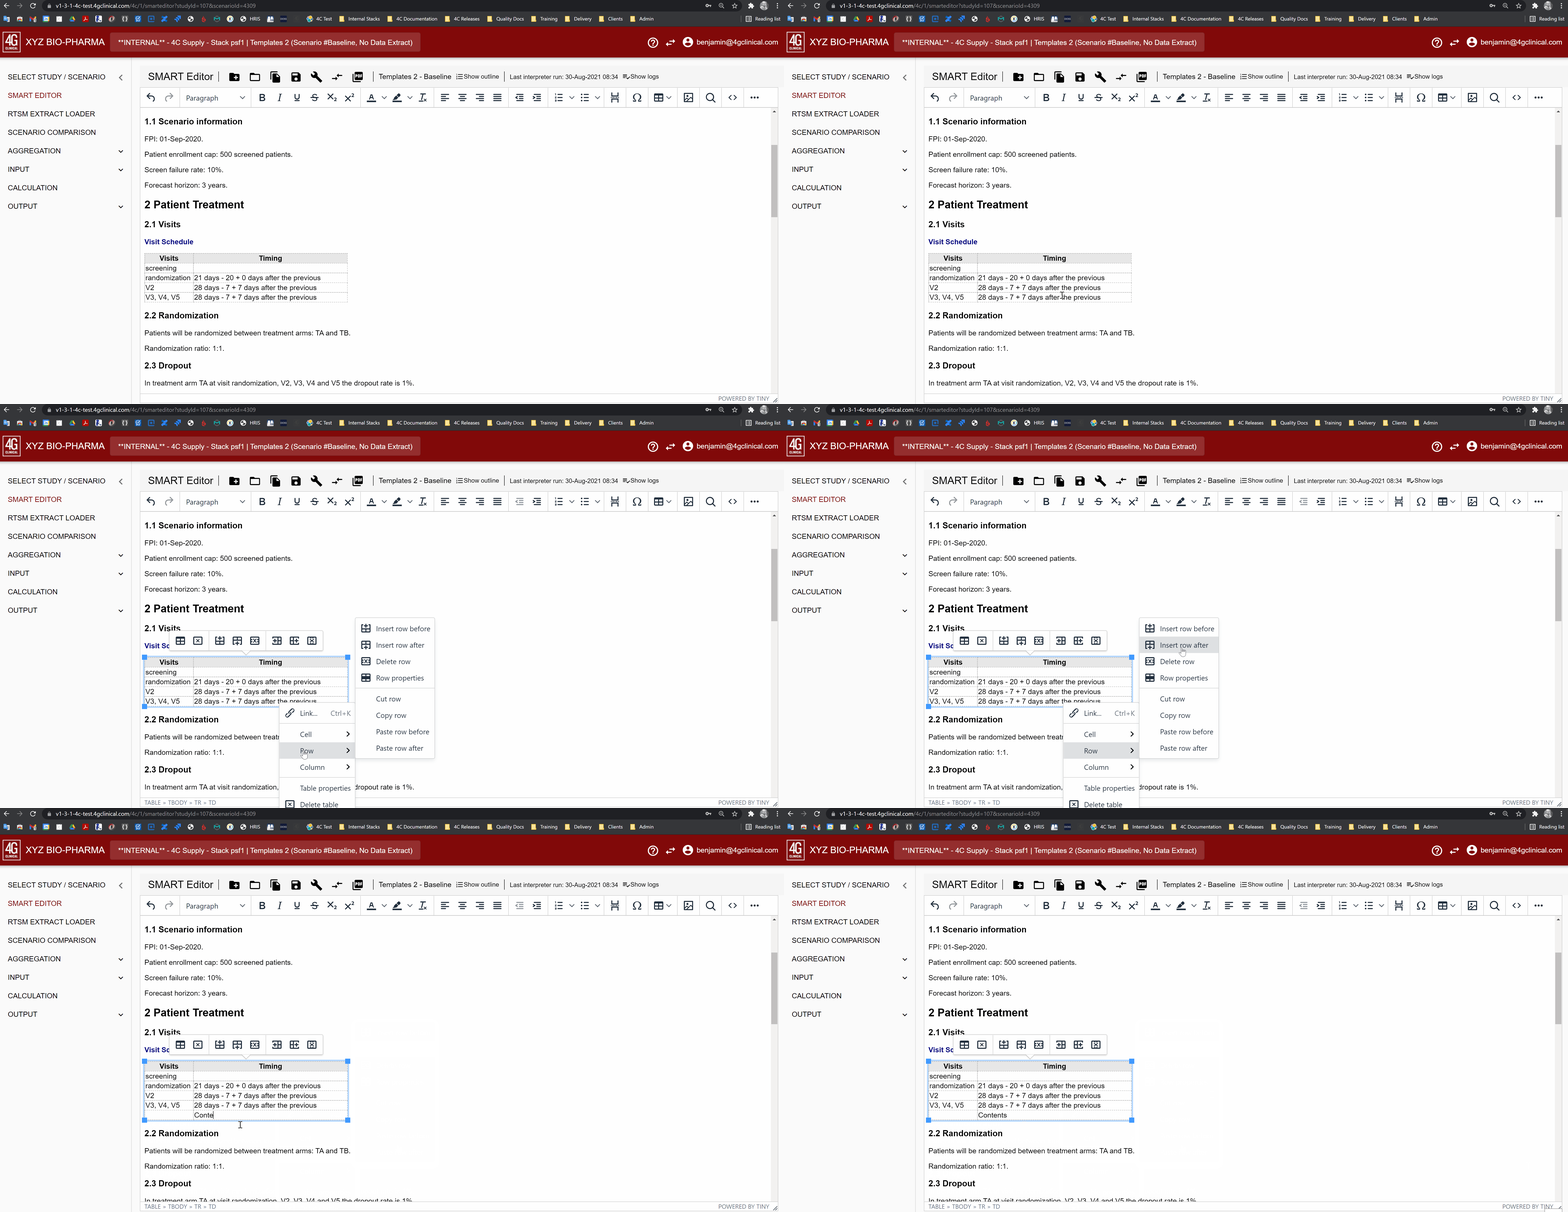
Click ‘insert row before’ or ‘insert row after’ in the table menu, section ‘row’
Copy and paste an existing row with the table context menu
Copy and paste an existing row with the table menu
Delete table rows
Table rows can be deleted in 4C Supply® Smart Editor using different table edit functions. Table rows can be deleted using the table popup menu, the table context menu, and the table menu in the menu bar:
Click the ‘delete table row’ icon in the table popup menu

Click ‘delete row’ in the table context menu, section ‘row’

Click ‘delete row’ in the table menu, section ‘row’
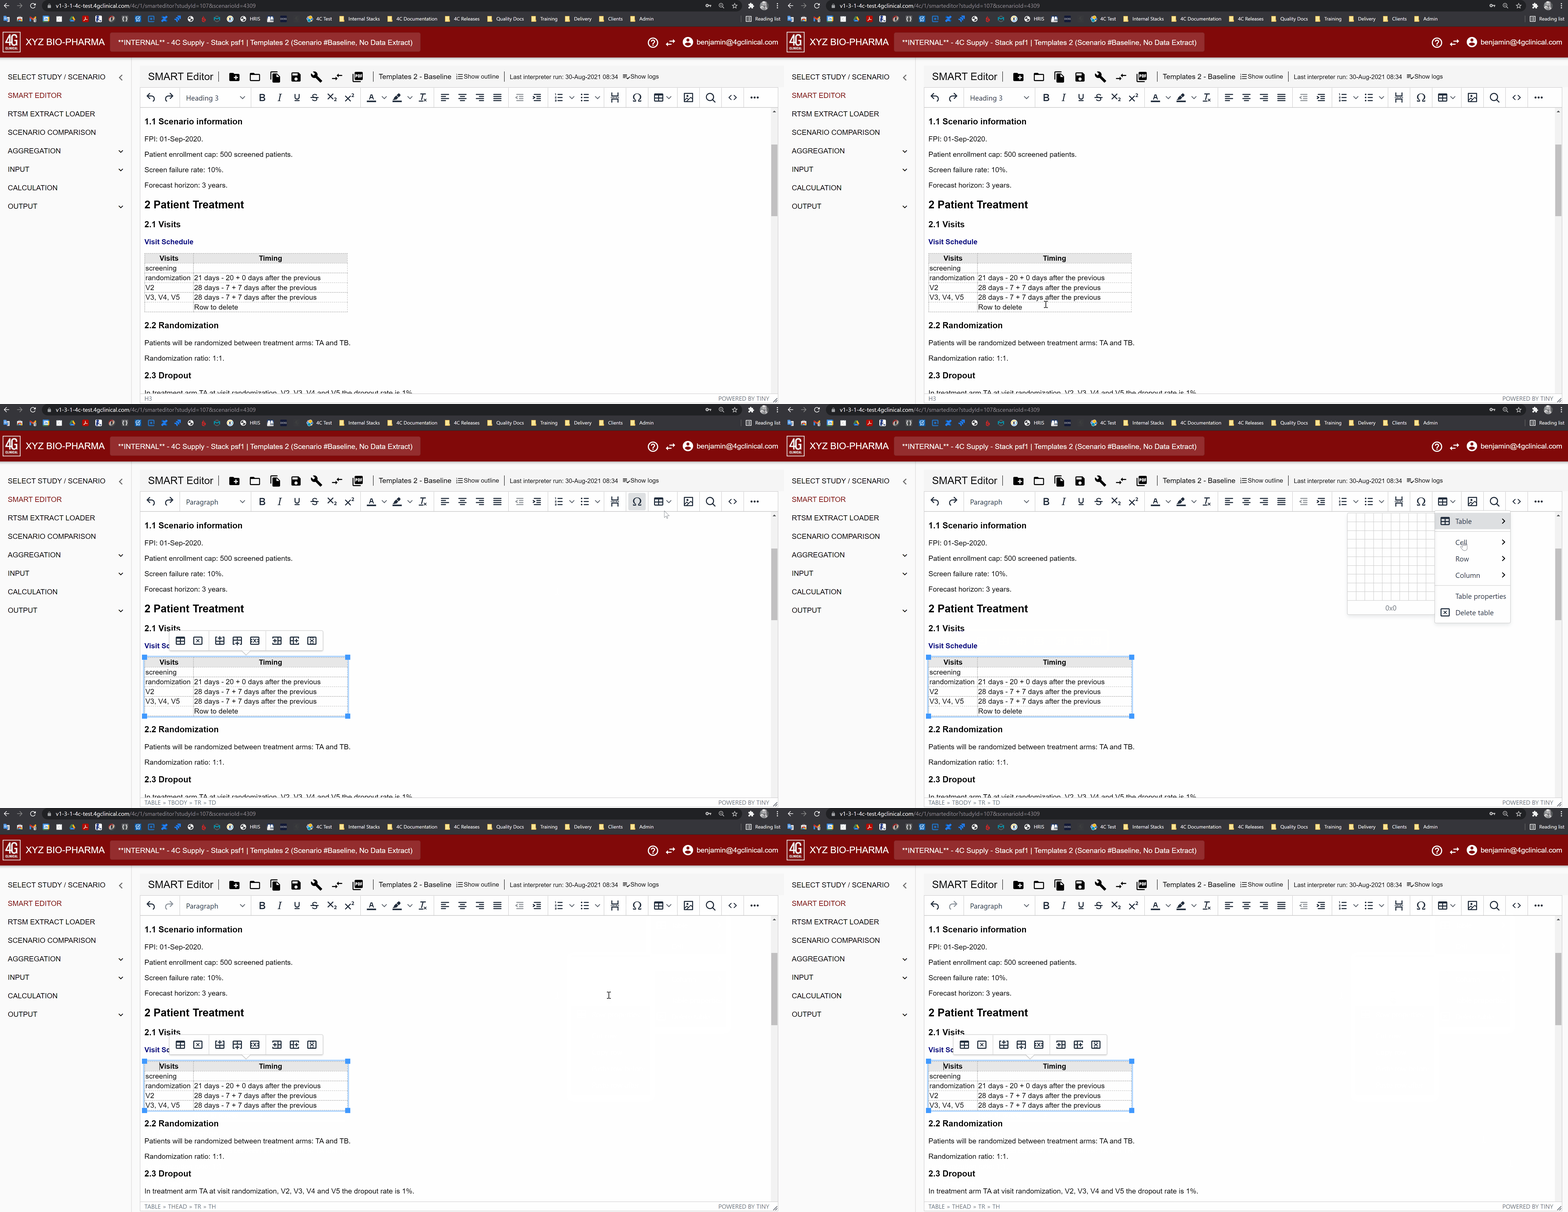
Insert table columns
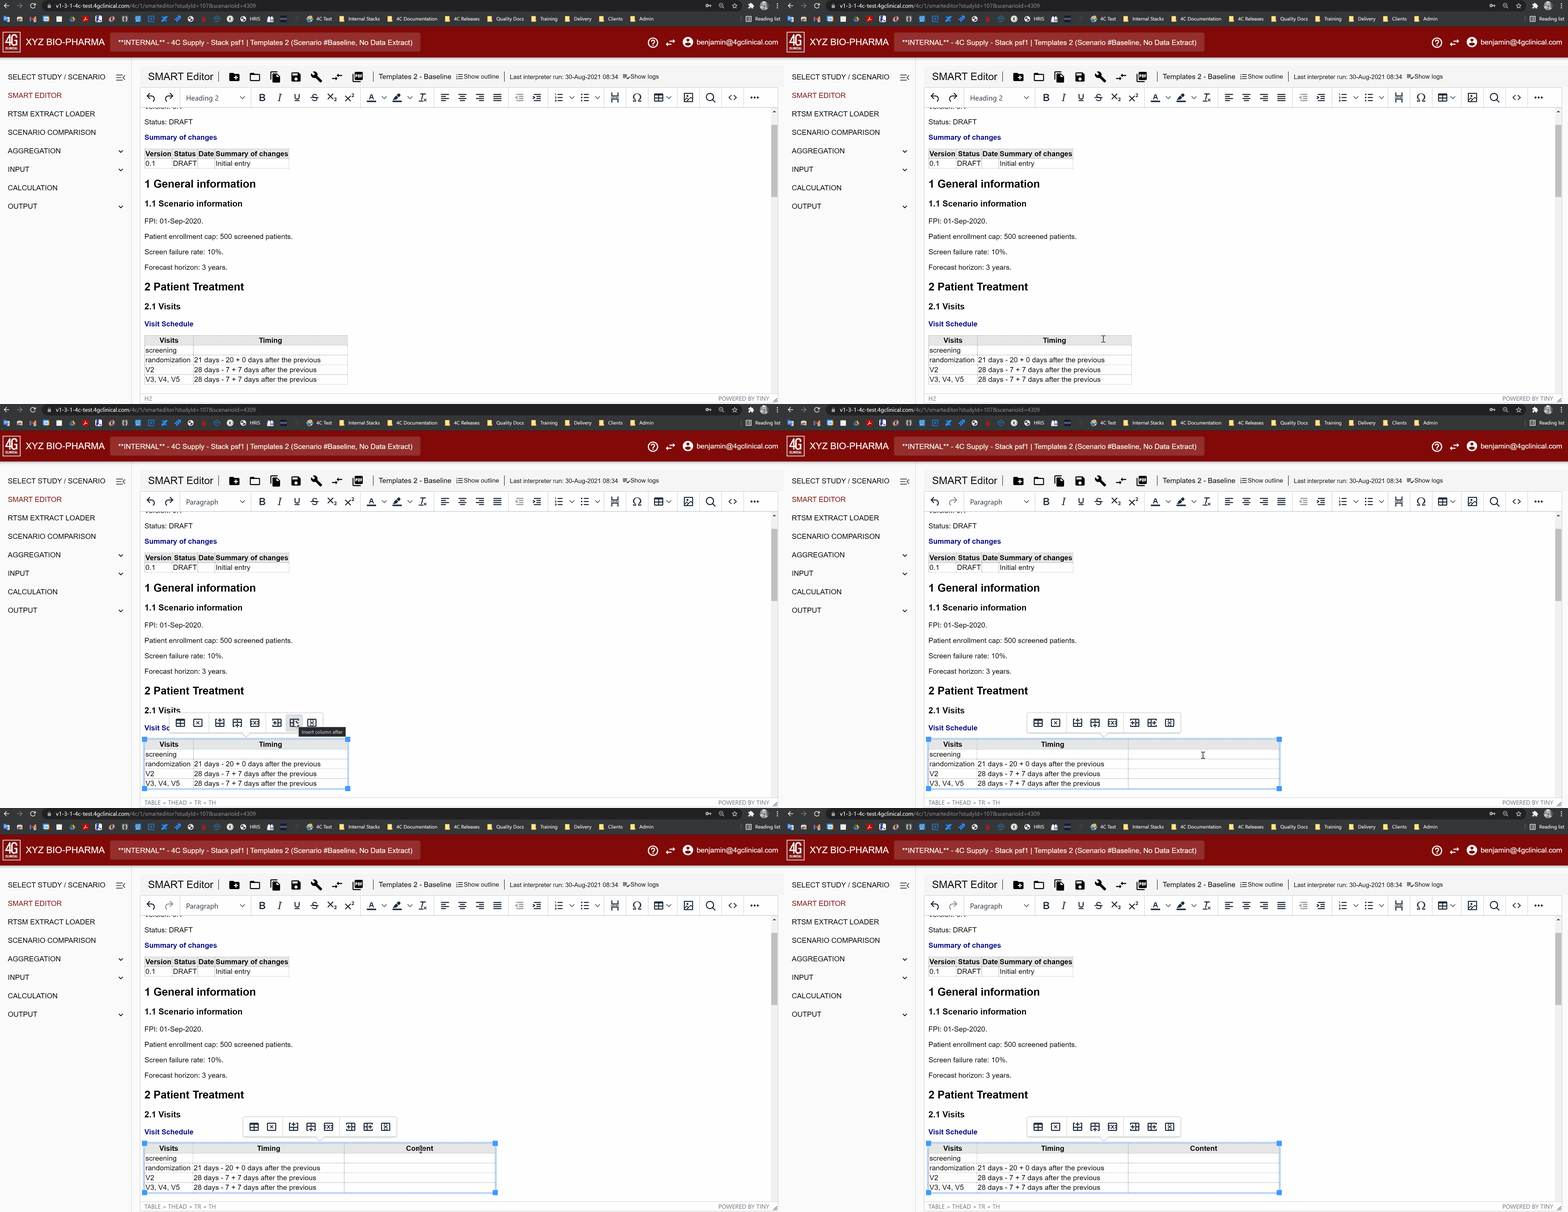
Table columns can be inserted in 4C Supply® Smart Editor using different table edit functions. Table columns can be inserted using the table popup menu, the table context menu, and the table menu in the menu bar:
Click one of the ‘insert table column’ icons in the table popup menu
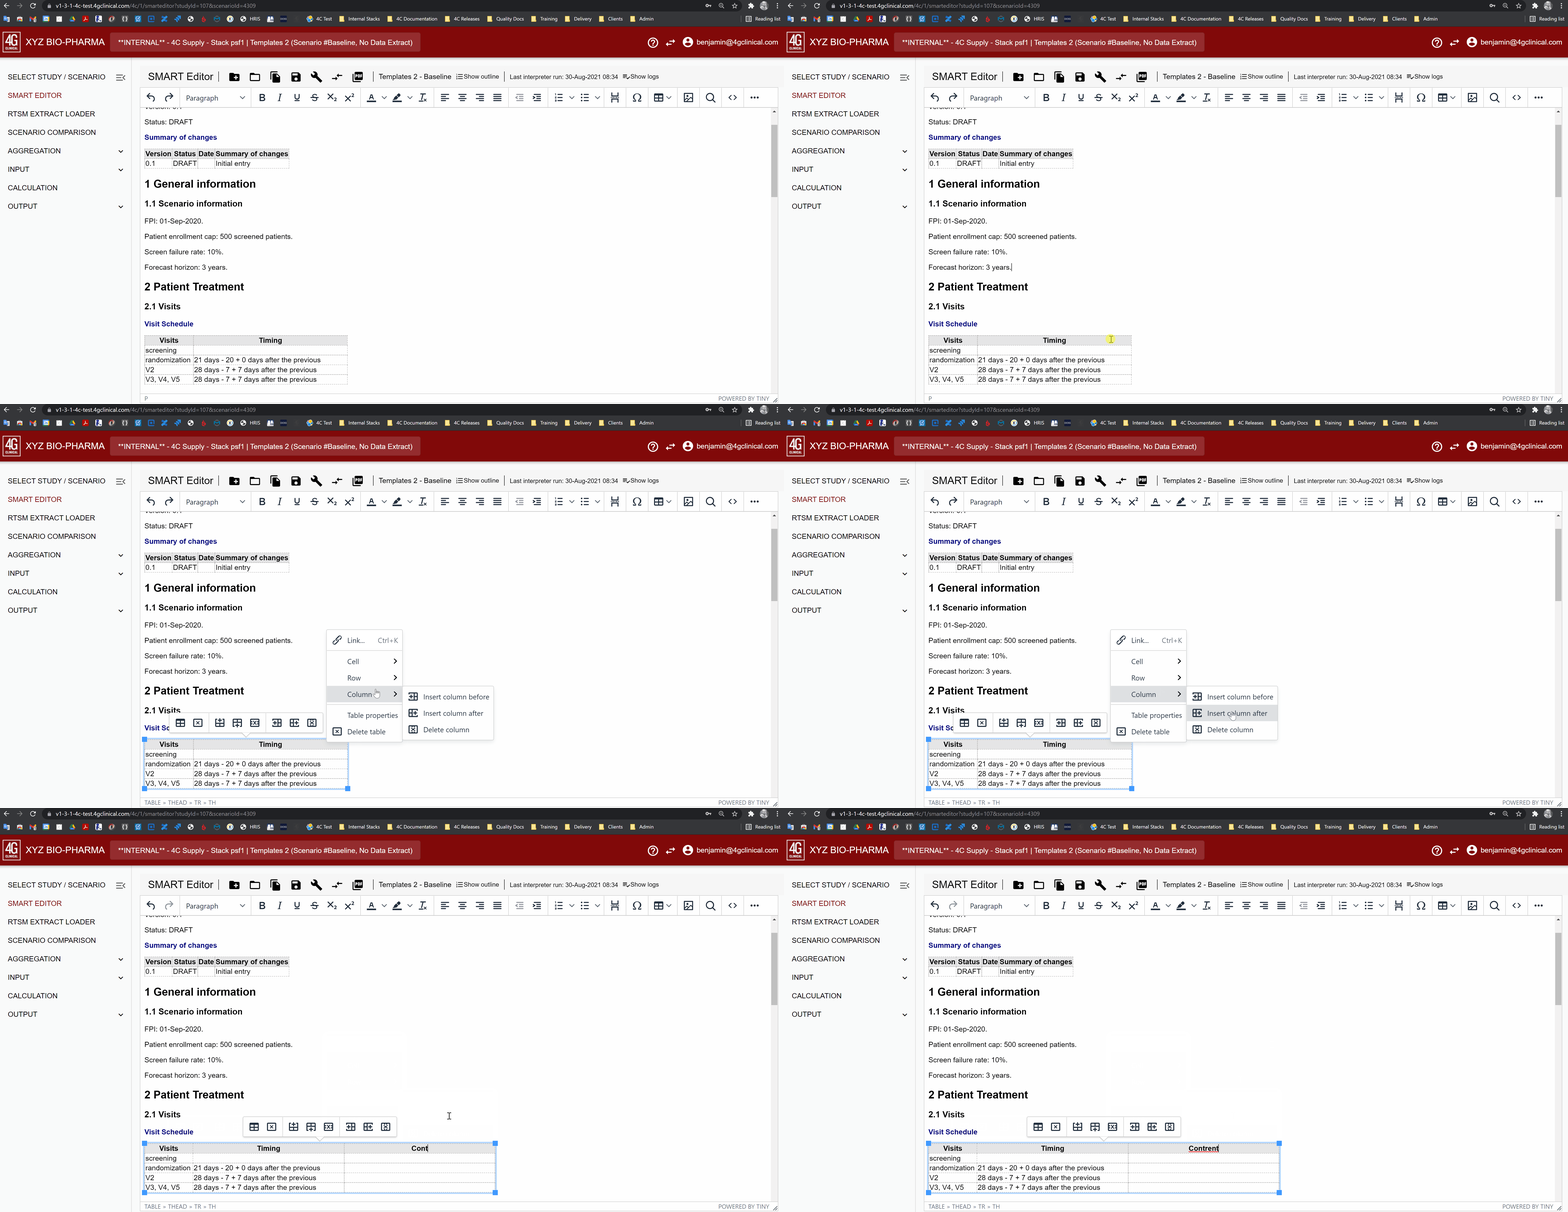
Click ‘insert column before’ or ‘insert column after’ in the table context menu, section ‘column’
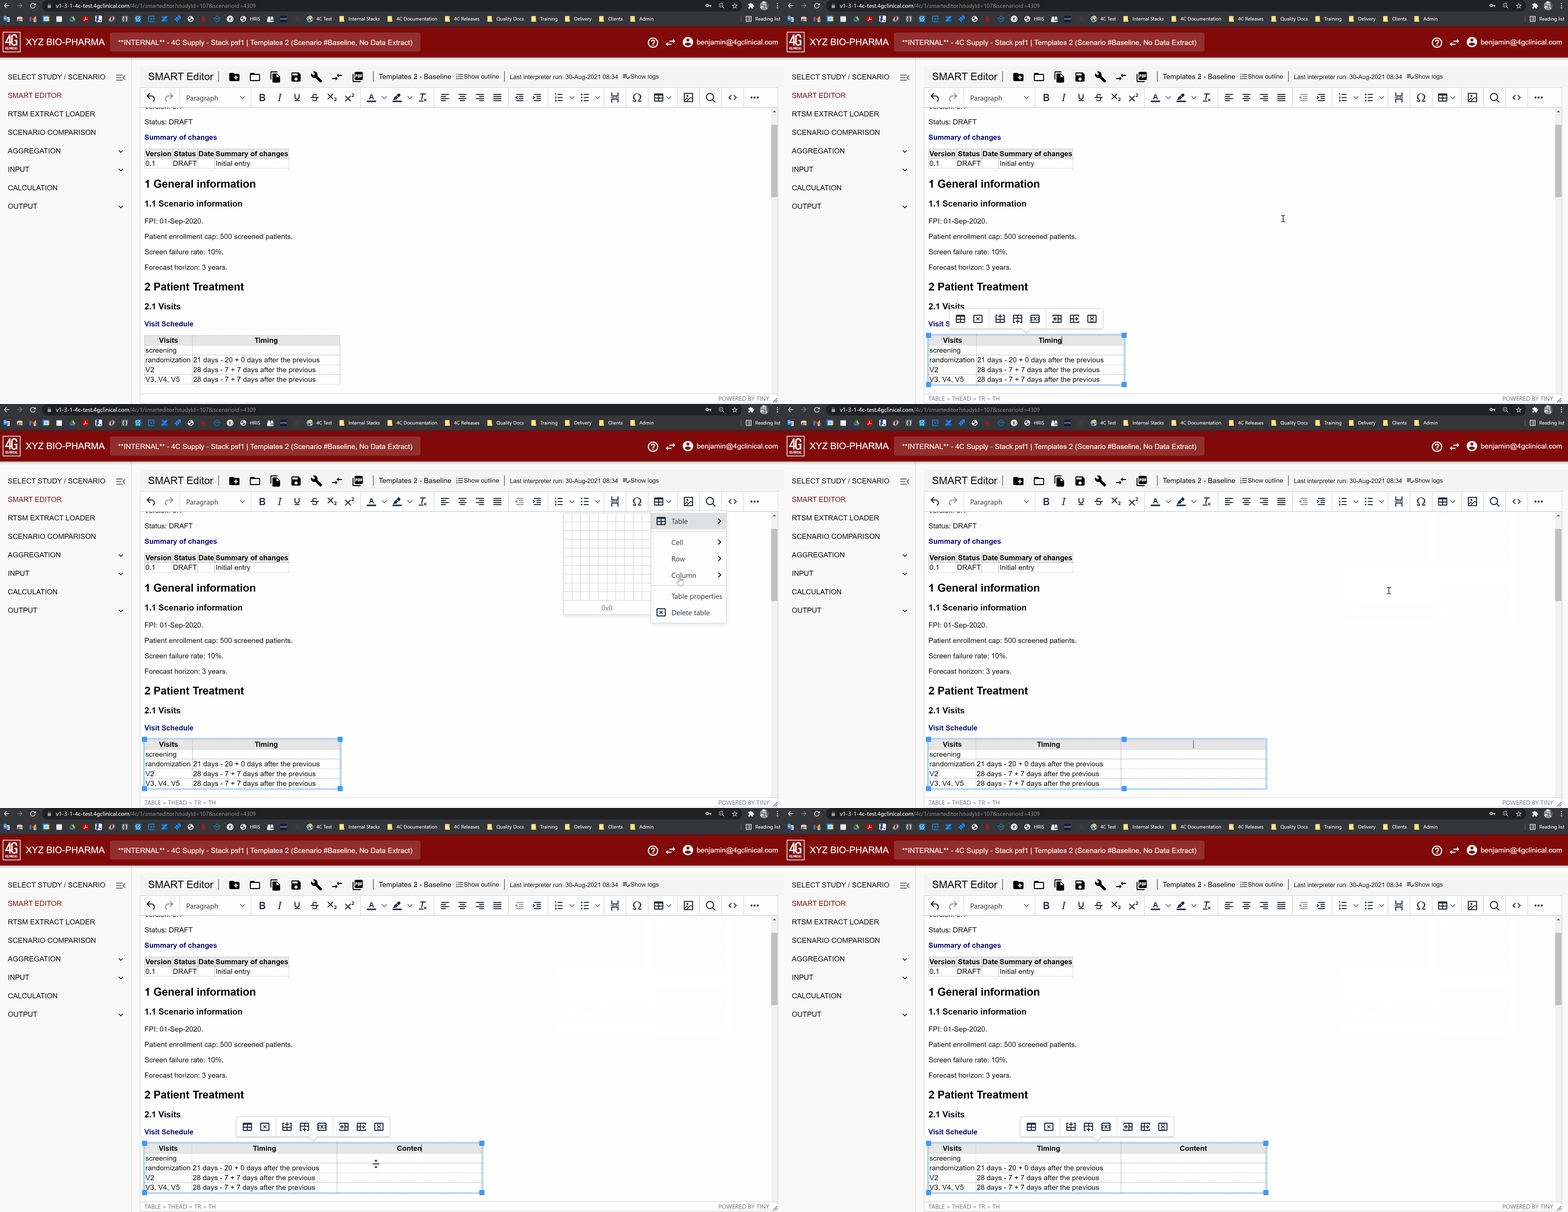
Click ‘insert column before’ or ‘insert column after’ in the table menu, section ‘column’
Note: Unlike table rows, it is not possible to copy and paste table columns in the 4C Supply® Smart Editor.
Delete table columns
Table columns can be deleted in 4C Supply® Smart Editor using different table edit functions. Table columns can be deleted using the table popup menu, the table context menu, and the table menu in the menu bar:
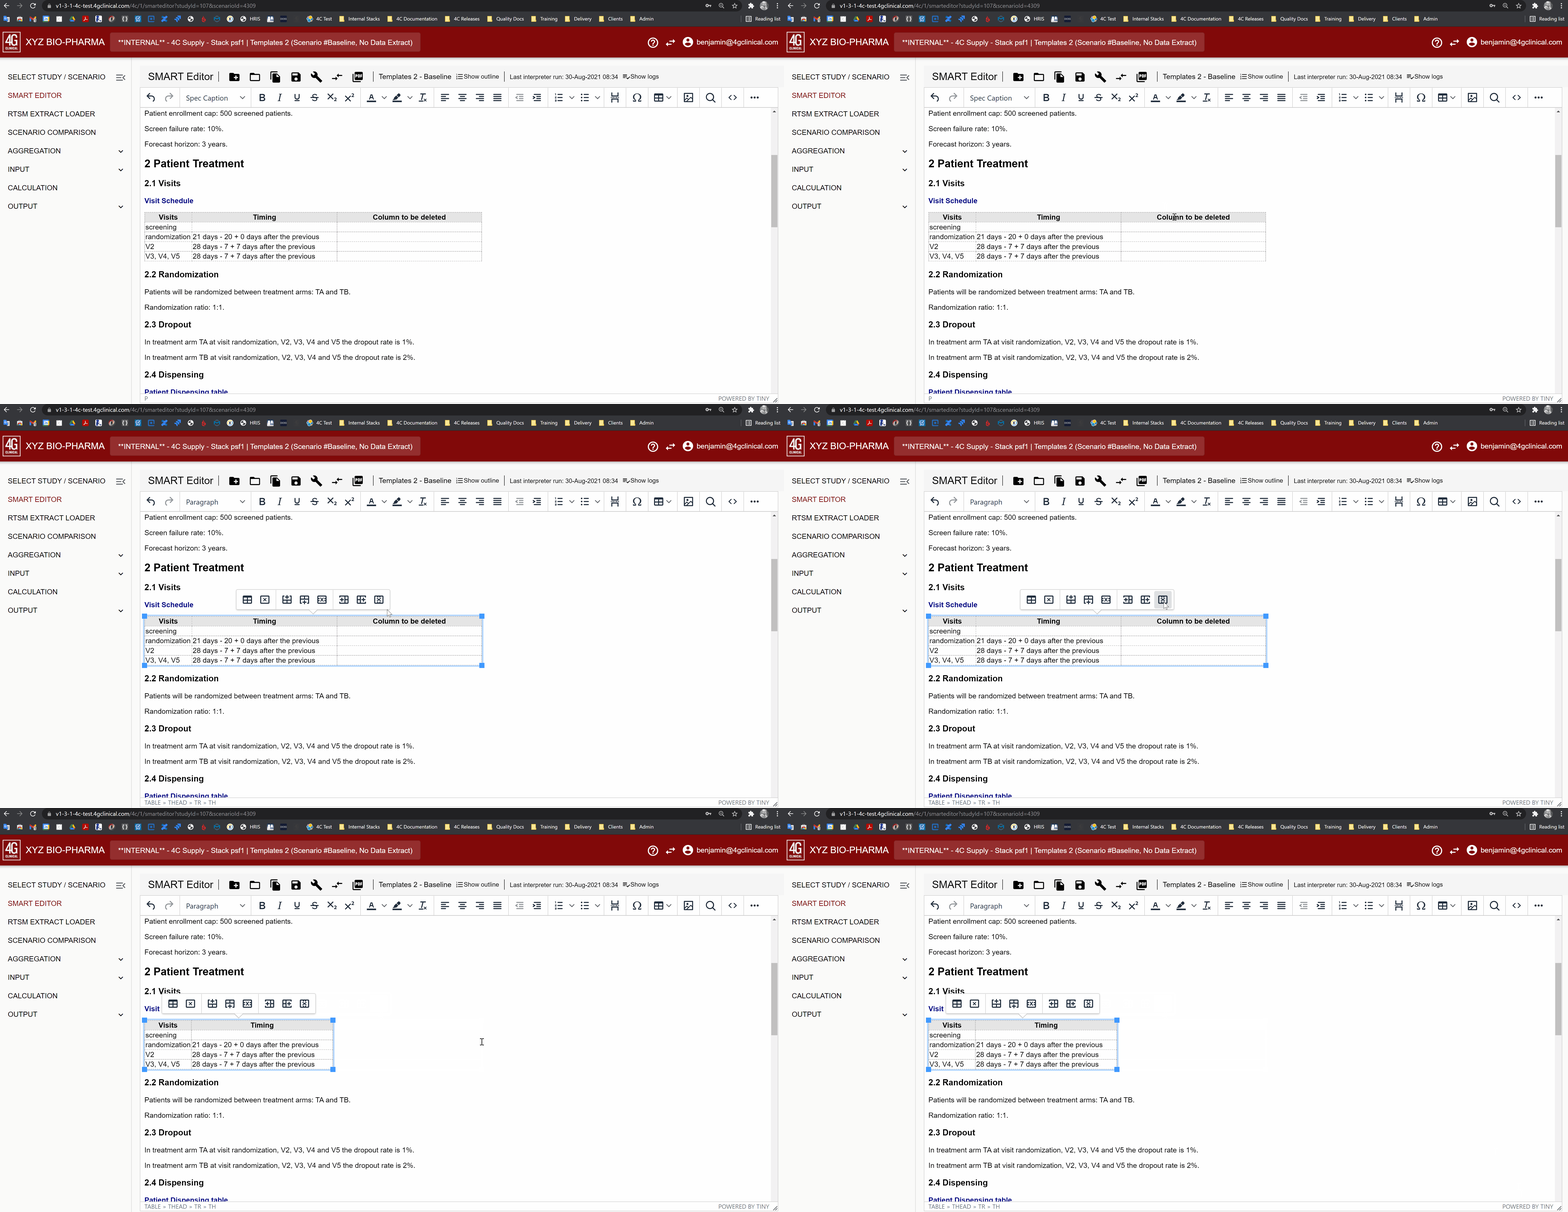
Click the ‘delete table column’ icon in the table popup menu
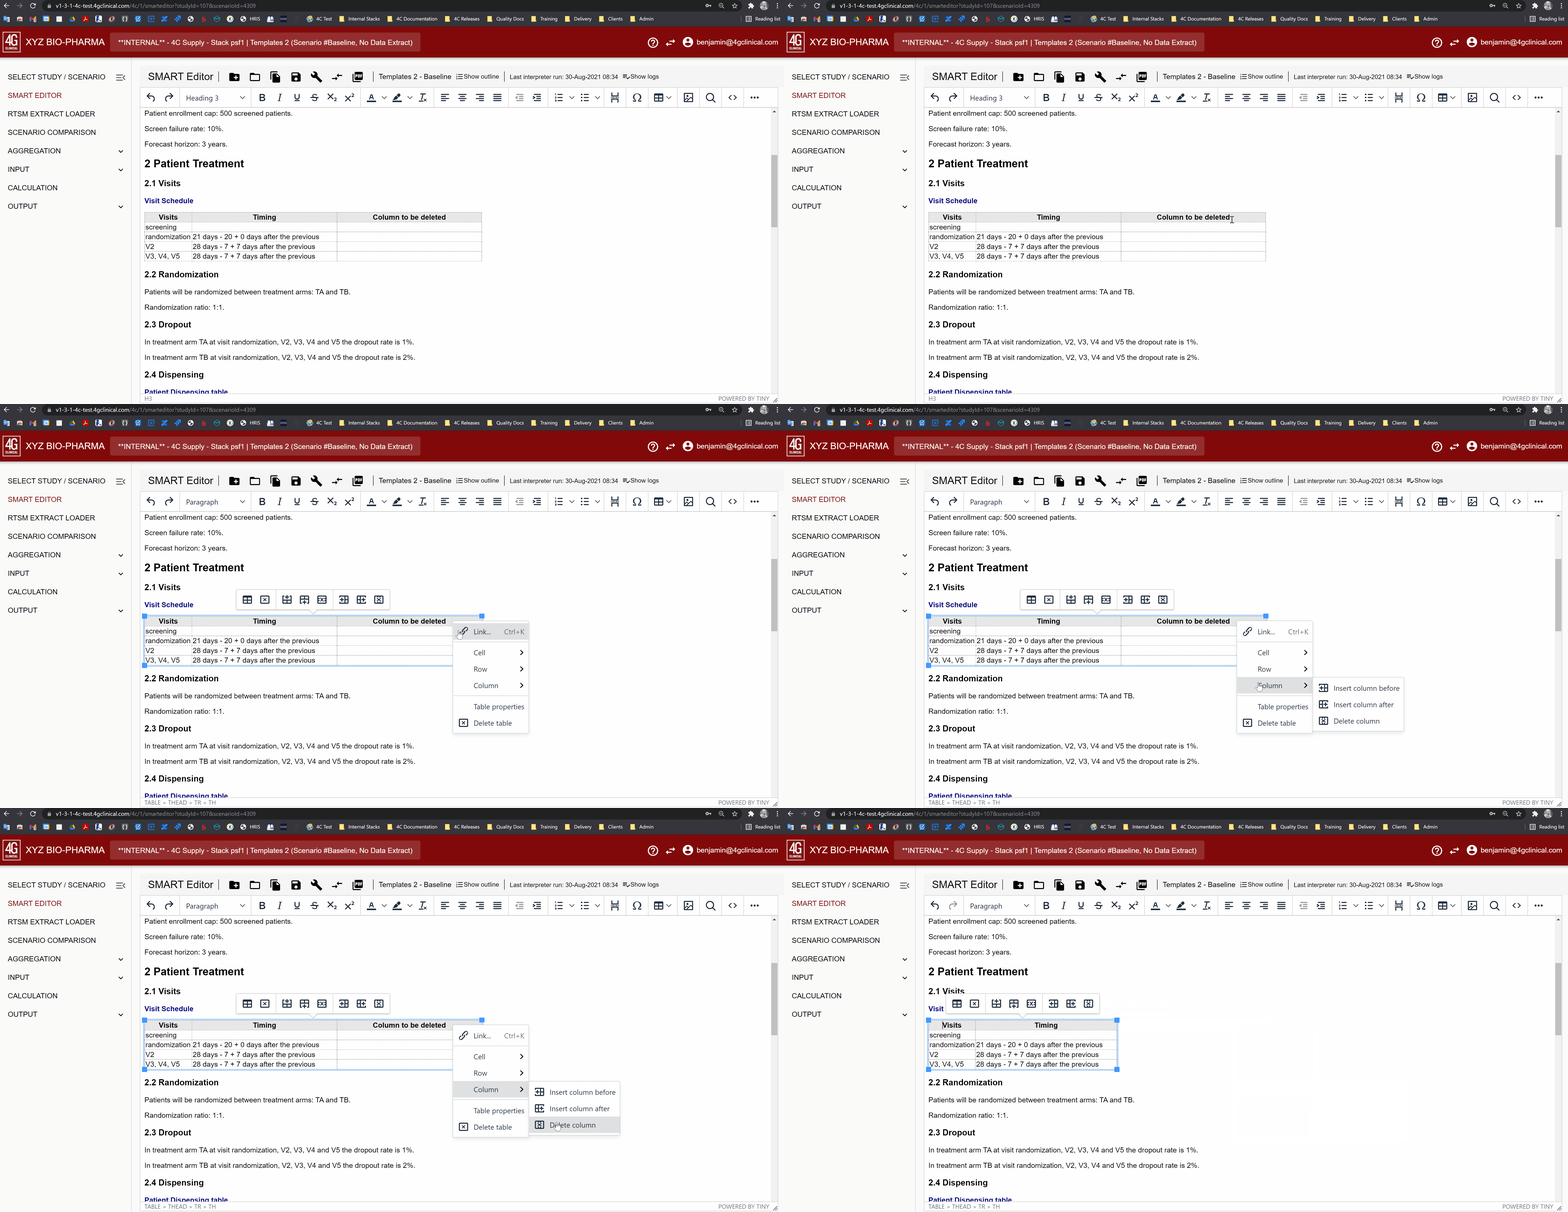
Click ‘delete column’ in the table context menu, section ‘column’
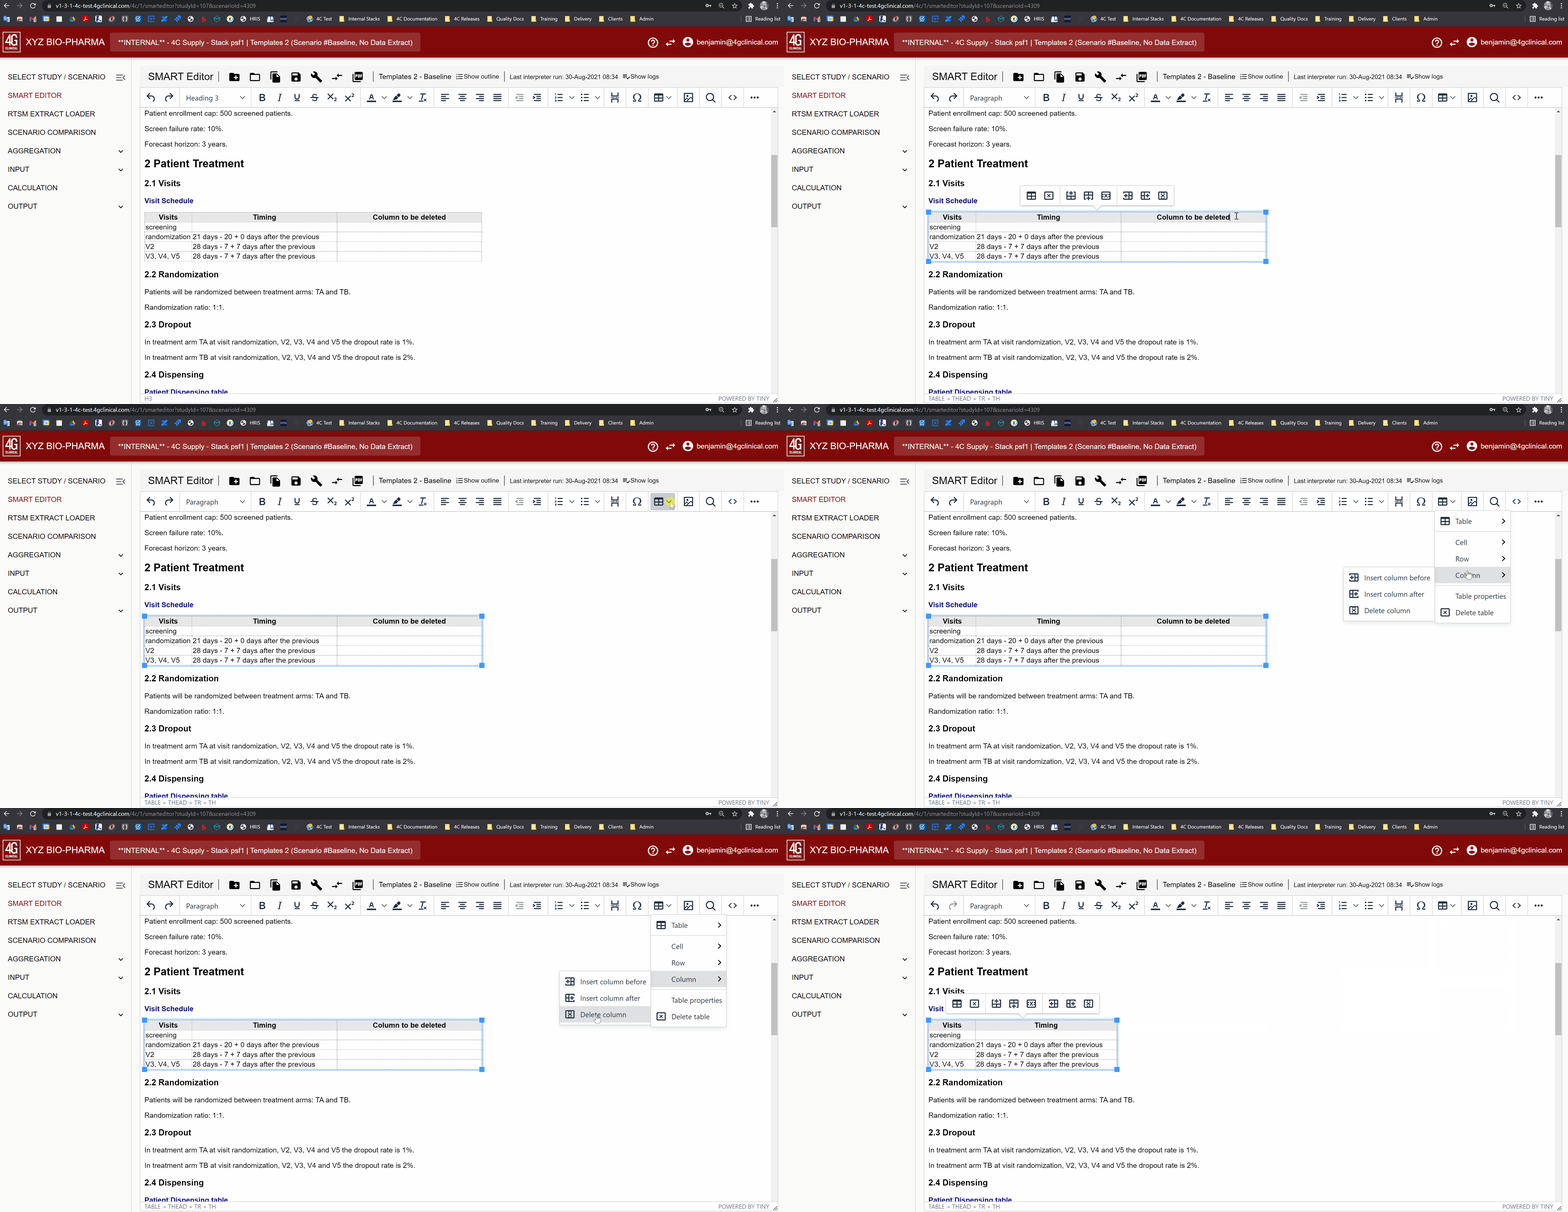
Click ‘delete column’ in the table menu, section ‘column’
Specification Formats
Specification Formats are attributes that can be assigned to text. Correct use of these formats is necessary for correct interpretation. Specification formats can be applied by selecting the target text and then changing the format using the dropdown format menu.

Specification Format Menu
Spec Caption
Spec caption is the required paragraph format for table headers. Each table in a 4C Supply® specification needs a table header that specifies the table type (e.g. Visit schedule or Dispensing units) and is formatted as ‘Spec Caption’ in order for the table to be interpreted correctly.
To add a table header to an existing table, write the table type directly above the table and format as ‘Spec Caption’ . When tables are created or uploaded in the 4C Supply® Smart Editor, a paragraph with format ‘Spec Caption’ is created automatically above the table. If needed, update the text so that it specifies the table type and ensure it is formatted as ‘Spec Caption’
Spec Info
Paragraphs formatted as spec info are not interpreted. This format can be used for information that is not to be interpreted i.e., user notes.
Spec Code
Spec code is a format that is not used in 4C Supply® specifications.
Hide when exported/printed
Paragraph format 'Hide when exported/printed' can be used to exclude paragraphs from the exported specification.
Paragraph
Format ‘Paragraph’ is the default format of text in the 4C Supply® specification. All text using this format will be read as part of the interpretation. Text in the format ‘Paragraph’ can also accept other paragraph formats, such as spec caption or spec Info.
Headings
Paragraph format 'Heading' can be assigned to specify that text represents a heading. Level 1 headings are not numbered, while headings of level 2, level 3, and so on are numbered. For example, to achieve a heading with the number 1.1, assign a level 3 heading to the first heading text in the spec.
Date Formats
4C Supply can interpret a number of different date formats but the general formula which would be followed is Day-Month-Year, if the month is placed before the day the date will be misinterpreted.
Acceptable date formats are as follows:
Format |
Example |
|---|---|
DD-Mmm-YYYY |
16-Nov-2025 |
DD MONTH YYYY |
16 NOVEMBER 2025 |
YYYY-DD-MM |
2025-11-16 |
DD Mmm YYYY |
16 Nov 2025 |
DD Month YYYY |
16 November 2025 |
DDMmmYYYY |
16Nov2025 |
DDMMMYYYY |
16Nov2025 |
If you are importing a list of dates from Excel and need to change the format follow these steps:
Select the relevant cells.
Right-click the selected cells and go to “Format Cells” (or use shortcut Ctrl+1/Cmd+1).
Open the “Number” tab.
Choose “Date” from the Category menu.
Choose one of the accepted date formats from the Type menu.